 User
User
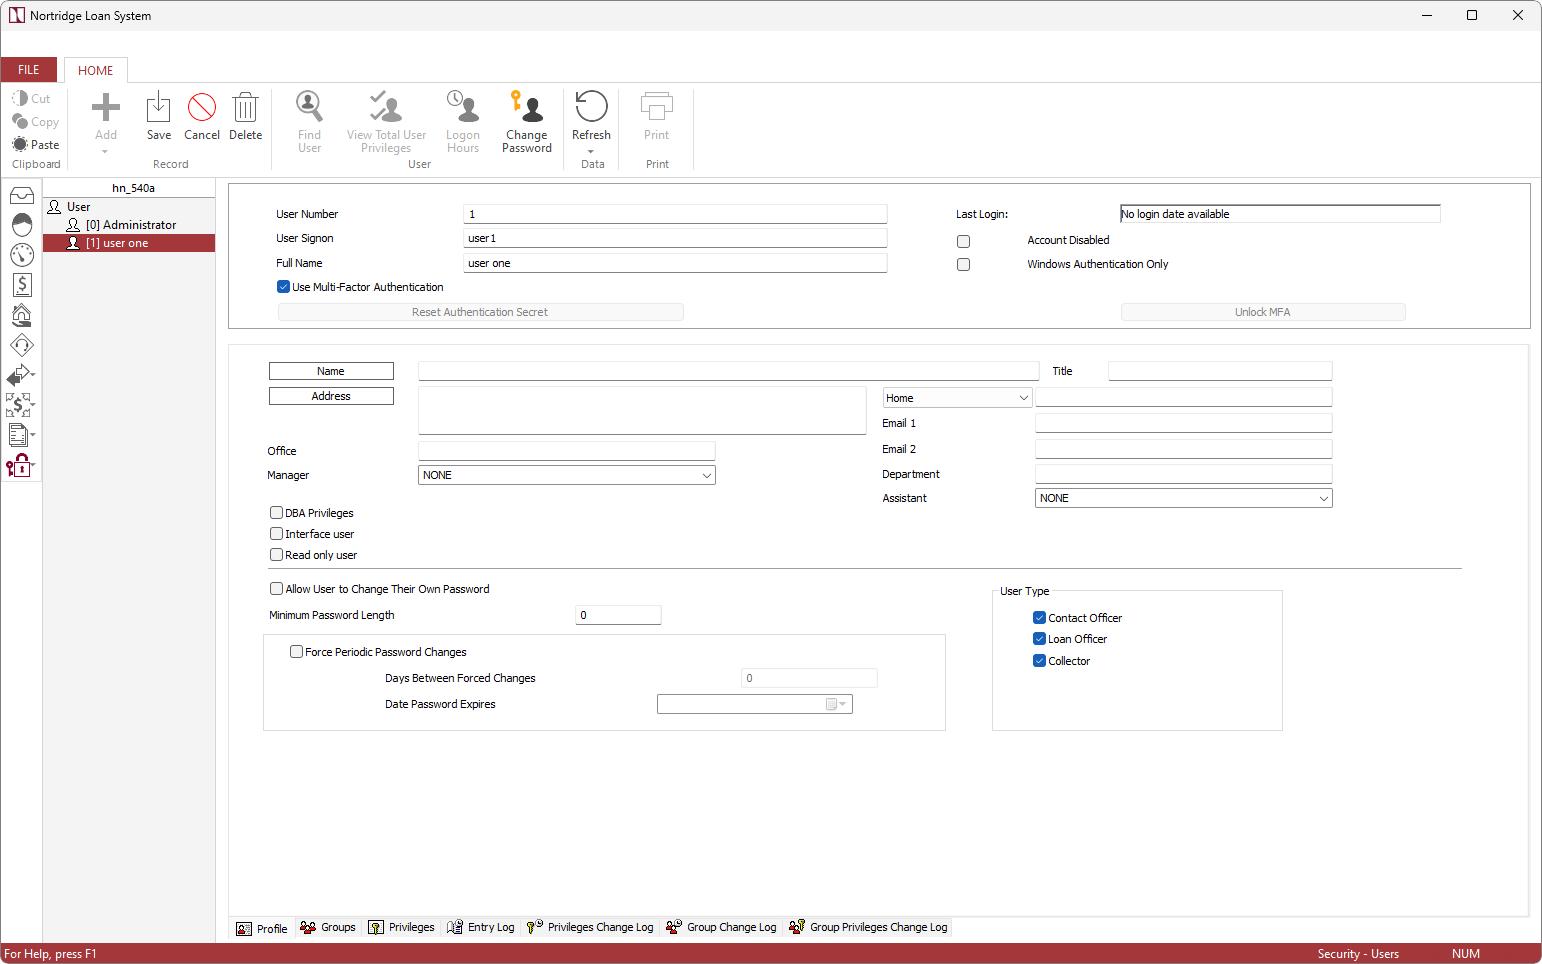
User profiles can be located by clicking  Security on the short cut bar. The users will be displayed in the Tree View. The user tree shows all of the user accounts that have been configured within the database. Only an Administrator account will exist on a new database. The administrator has full access to the NLS system—the password is the only setting on the account that can be changed.
The User view is divided into a top pane and a lower pane. The top pane always displays the user’s account name and related information. The content of the lower pane changes accordingly with the tab selection at the bottom of the window.
When you leave a user’s record after making changes, you will be prompted to save or cancel those changes.
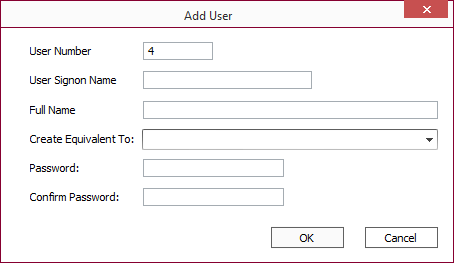
To add a new user, click  on the toolbar to open the Add User window. This window has fields to add the User Signon Name, the user’s Full Name, Create Equivalent To:, and Password.
The Create Equivalent To: field will allow you to copy the setup of an existing user by selecting from a drop down menu.
The password that is entered on the Add User window will be required for the user’s first sign on, but the user will be immediately prompted to set a new password.
A password can have a maximum length of 22 characters and may consist of uppercase (ABC…), lowercase (abc…), numeric (123…), or symbols (!@#…).
NLS 5.43 and later
Enter the User Principal Name in the UPN field if it differs from the user’s email address.User Report
A comprehensive list of Users can be printed using the User List report included in the standard report pack. See Printing Reports.
Ribbon Bar
 Find User Find User |
Opens a dialog to search for users by their User Signon or Full Name. |
 View Total User Privileges View Total User Privileges |
Displays a tree showing the user's total privileges including those inherited from groups in which the user belongs. |
 Logon Hours5.5+ Logon Hours5.5+ |
Displays a 24 hours by 7 days matrix showing the hours in a week the user is or is not allowed to log into NLS.
To change the permission for a specific hour, click the Logon Permitted or Logon Denied button then click on the corresponding block in the matrix. 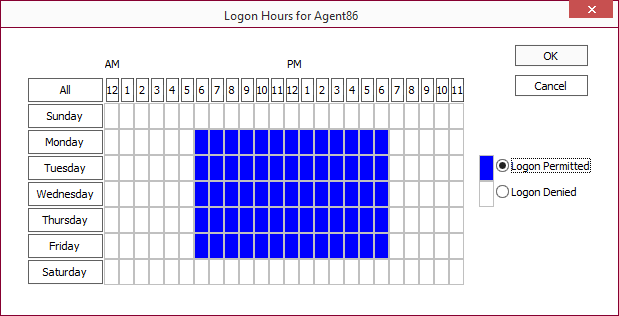 |
 Change Password5.5+ Change Password5.5+ |
Displays a dialog to change a user’s password. Users can change their own password if they have been granted the View, Update, and Change Password permissions in the Users section of Security. Select the User must change password at next login option to force the user logging in to set their own password when they next log in. If the account, under Active Directory, is locked an option to unlock the account will be available.5.15+ |
 Profile
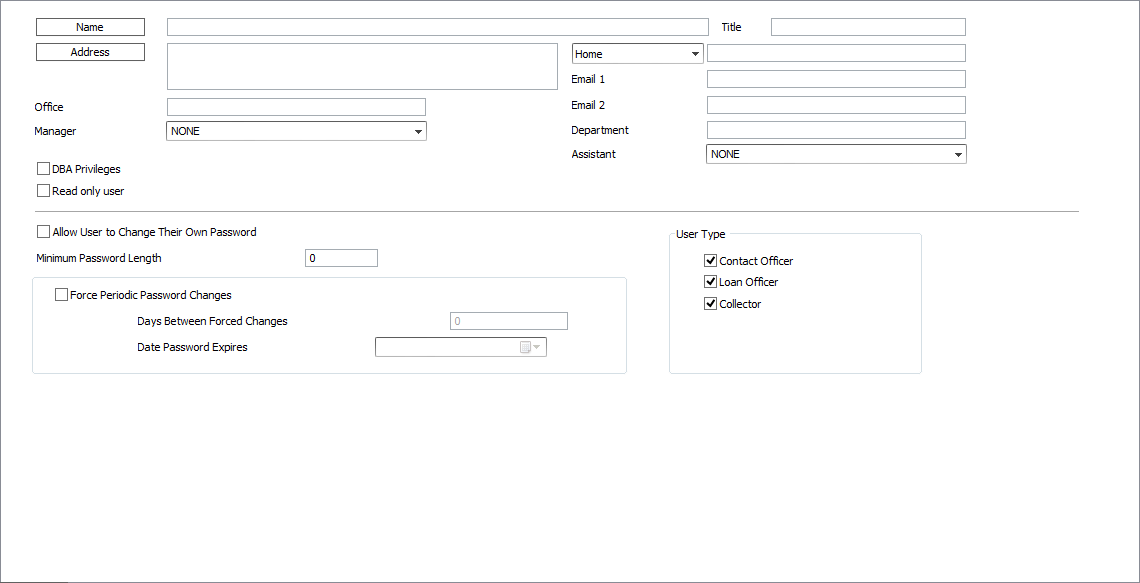
The Profile tab of the User allows the system administrator to set basic parameters for an account, such as the user signon, password, and other basic information.
Fields in the User Profile
| User Number | This is a system defined reference number. The Admin user is always assigned number 0, and each new user is assigned the next available number as they are entered. |
| User Signon | This is the account name that the user will use to sign on to the system. This field is set when the user account is created but the administrator may change it at a later date. |
| Full Name | This field may be used to enter the entire name of the user. This field is set when the user account is created but the administrator may change it at a later date. |
| Last Login | This will display the last date and time that the selected user logged into the system. If the user has not logged in since the account was created, the message “No login date available,” will be shown. |
| Account Disabled | When selected, the selected user will be prevented from logging into the system. |
| Windows Authentication Only | When selected, the user can only log on to NLS using Windows authentication. The user’s login name and password must match the login name and password of the user’s Windows login. |
| Select this option to require MFA for the user. This option is only available when MFA Type is configured in System Defaults. | |
| Click this button to clear the user’s authentication secret to force the user to redo the TOTP (timed one-time password) setup process next time they try logging in. A situation in which this will occur is if a user is unable to successfully read the QR code using their authenticator app and subsequently quits NLS without completing the setup. This button is only visible when Use Multi-Factor Authentication option is selected. | |
|
Unlock MFA5.34+
|
This button will be enabled when a user becomes locked out of NLS after the number of failed attempts allowed is exceeded as configured in System Defaults. Click this button to reset the attempts counter for the user. This button is only visible when Use Multi-Factor Authentication option is selected. |
| Name/Address/etc | These fields allow you to keep track of your employee information for all NLS users. |
| DBA Privileges | When selected, any assigned privileges are overridden by the DBA privilege, which grants complete access to the user. |
| When selected, the user will not be able to log in if the active user count will exceed the total license count. If this option is not selected, the user will not be able to log in if the active user count will exceed the total license count minus the Interface License Set Aside value. |
|
| Read only user | When selected, the user will only be able to view contact, loan, inbox, and reports.
Note Cash flow report and collector mode are not accessible to read only users. |
| Allow User to Change Their Own Password | When selected, the user may change their own password by clicking the change password button. The user must have the privilege to view users in security in order to access the button. |
| Minimum Password Length | This setting allows the administrator to define a minimum number of characters that the program will accept as a valid password for the selected profile. |
| Force Periodic Password Changes | When selected, the user will be required to change their password periodically. This setting is used in conjunction with Days Between Forced Password Changes and Date Password Expires settings. |
| Days Between Forced Password Changes | This number allows the administrator to define the length of the period between password change prompts. It is only applicable if Force Periodic Password Changes is enabled. |
| Date Password Expires | This is the date on which the user will be prompted to set a new password. Once the password has expired, the Days Between Forced Changes setting will determine the next date for which a new password is required. This setting is only applicable if Force Periodic Password Changes is active. |
| User Type | Selecting any one of these three options (Contact Officer, Loan Officer, or Collector) allows this user to be a selection in the drop down list for the appropriate fields on the Contact or Loan account. |
 Groups
To add a user to a group, click the Groups tab at the bottom of the security view.
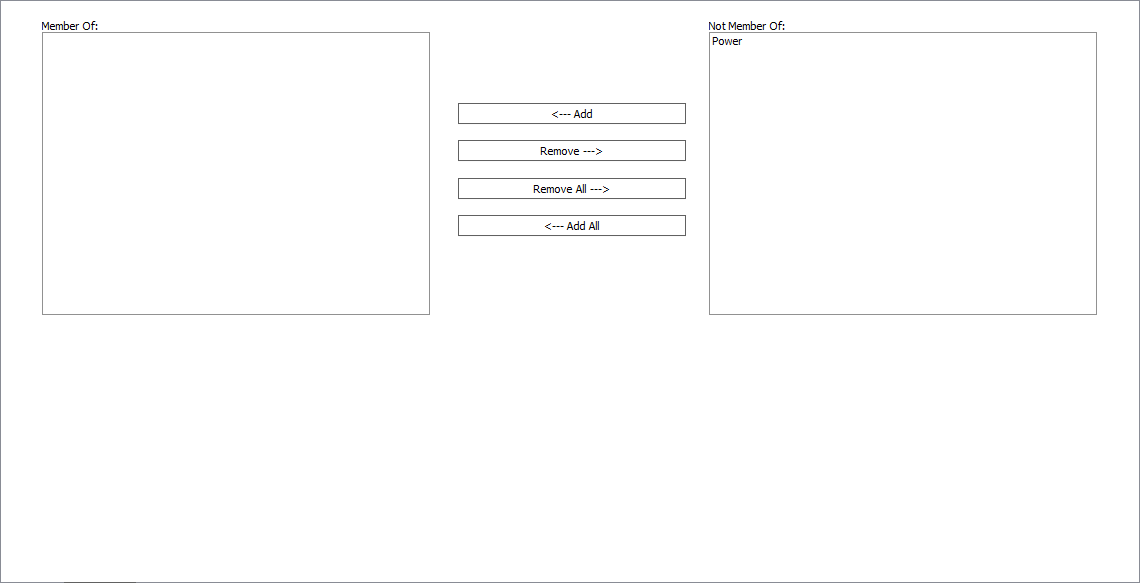
The Groups tab shows the status of all user groups as they relate to the user. Groups that the user belongs to are shown on the left in the Member Of box, while groups that the user does not belong to are shown to the right in the Not Member Of box.
To add the user to a group, select the group in the Not Member Of box and click <---Add.
To remove a user from a group, select the group in the Member Of box and click Remove--->.
Click <--- Add All to move all groups to the Member Of box.
Click Remove All---> to move all groups to the Not Member Of box.
 Privileges
Security privileges are used to manage a user’s access to functions within NLS. The permission granted with a security privilege applies globally to all data related to that function. Access to some data—such as contact types, comment categories, and status codes—can be controlled on a more granular level using trustee settings in their respective setup configuration.
A user’s security privileges are set in the Privileges tree. To enable or disable a privilege, you must expand the tree to the bottom level of the specific privilege. To expand a section of the tree, click  then enable a privilege by selecting the option .
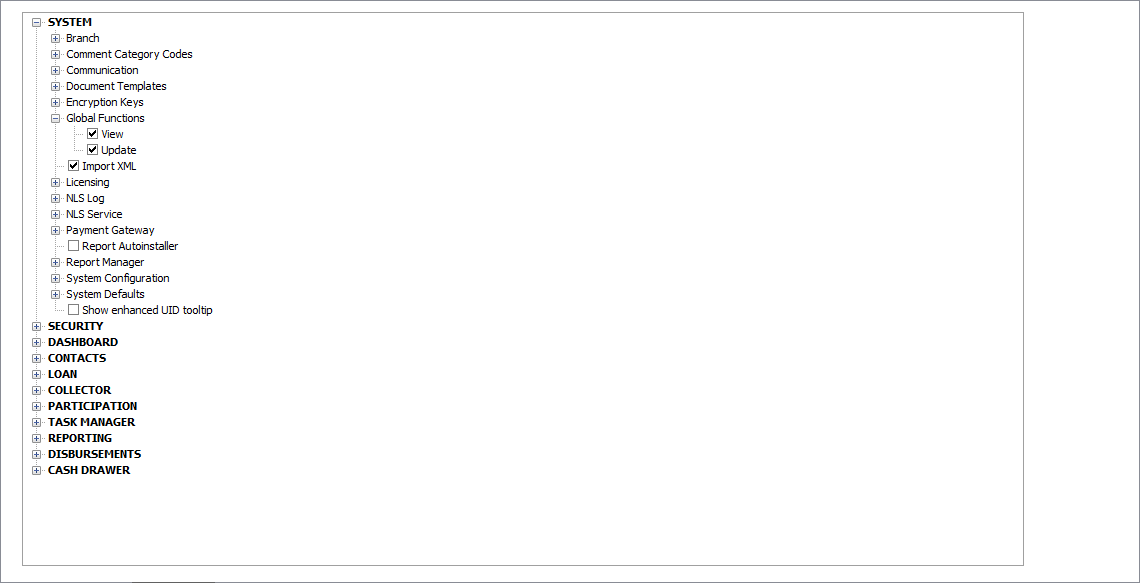
To check or uncheck a large range of options quickly, right-click on any item in the tree and select Mark All from the context menu. All items under the item, including all item in its sub-branches, will be enabled. To disable all items under a tree item, right-click and select Unmark All.
Context Menu
| Mark All | Select all options, including all items in sub-branches, under the selected item. |
| Unmark All | Deselect all options, including all items in sub-branches, under the selected item. |
| Expand Selected | Expand to show all items under the selected item. Does not expand sub-branches. |
| Expand All | Expand to show all items, including all sub-branches, under the selected item. |
| Unexpand Selected | Collapse to hide all items under the selected item. Sub-branches will remain in its current expanded or collapsed state. |
| Unexpand All | Collapse to hide all items, including all sub-branches, under the selected item. |
| Print Tree | Prints the entire tree in its current visible state. |
 Entry Log
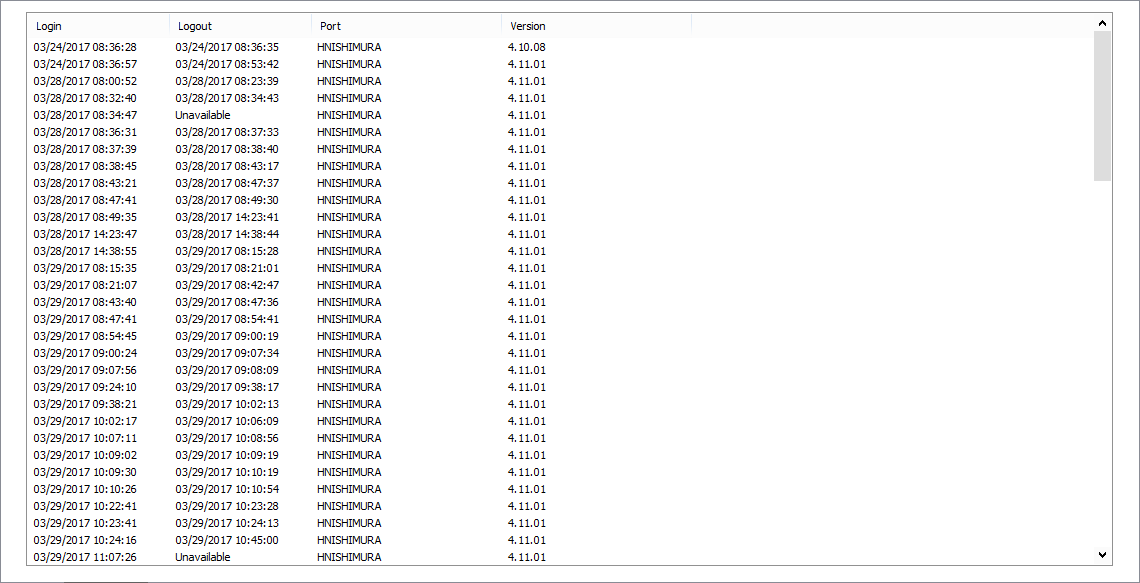
The Entry Log tab is a record of each time the user has logged on and logged off the system. The table shows the login time, logout time, port ID, and NLS version of every session that the user was connected for.
 Privileges Change Log
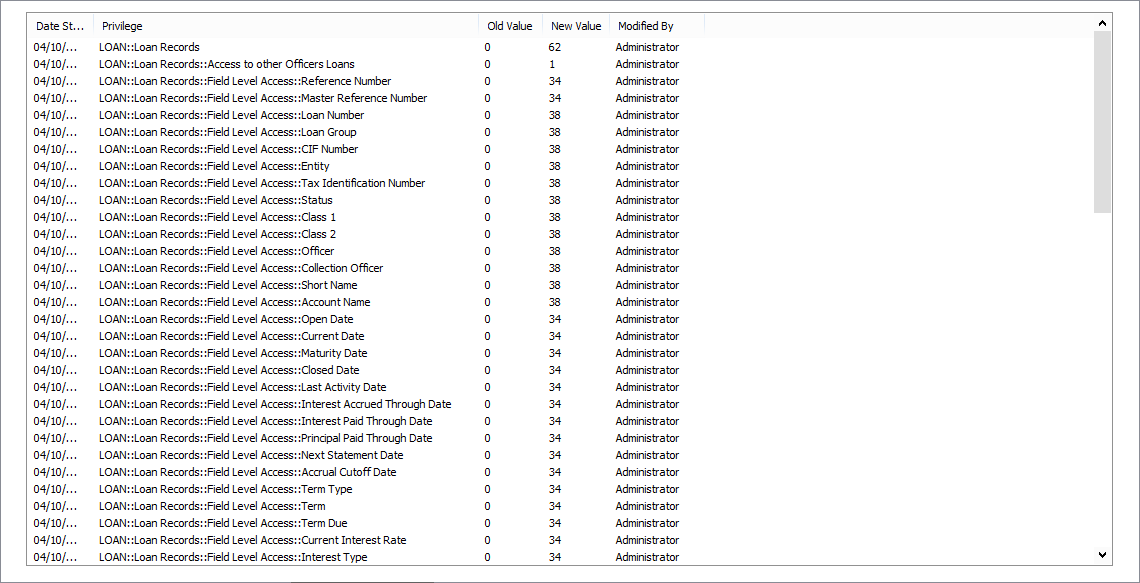
The Privileges Change Log is a record of all modifications to the privileges for a single user. The table displays every privilege that was modified on a single line with a Date Stamp, a description of the Privilege, the Old Value of the privilege, the New Value of the privilege, and the user who made the modification.
 Group Change Log
NLS 5.20 and later
The Group Change Log is a record of all modifications made to the user’s group association.
 Group Privileges Change Log
NLS 5.20 and later
The Group Privileges Change Log is a record of all modifications to the privileges of a group to which the user belongs.
