Transaction Codes
In the Nortridge Loan System, all transaction entry functions make use of structured Transaction Codes. These codes define the way any transaction affects the general ledger, the loan balances, the billings, and the payments.
The integrated functionality of transaction code definitions and parameters allows great flexibility in setting up user-defined transactions.
Transaction Codes are configured in Setup > Loan Setup > Transaction Codes.
| Button | Description |
|---|---|
 Add Add |
Click to add a new transaction code. |
 Delete Delete |
Click to remove the currently selected transaction code only if the transaction code is 500 or above and is not currently in use. |
 Modify Modify |
Click to modify the transaction code and the description. |
 Modification History Modification History |
Shows a list of the changes that have been made to the selected transaction code.
This list shows who has made modifications to the Loan Group and when. |
 Print Print |
Produces a printout of the complete list of transaction codes and their descriptions. This printout does not include any of the detailed setup of the transaction code. |
 Trustee Trustee |
The Trustee feature allows you to set up a transaction code that can only be accessed by certain “Trustee” loan officers. To set the trustee access for a transaction code, select a transaction code and click the trustee button.
By default, the trustee access for a transaction code is set to Everyone. If any user or user group is added to the list of trustees for this transaction code, that list of trustees will supersede the setting: Everyone, and all users who are not then specifically included on the trustee list, or who are not members of groups that are included on the trustee list, will not be able to access this transaction code. |
|
|
Click to display the odd numbered transaction codes used when transactions are reversed. |
 to see a list of the setup parameters after the modification was made.
 to see a side-by-side list of the setup parameters before and after the modification. This is useful to illustrate the specific change.
The parameters that define a transaction code are configured on the various tabs:
General Ledger Controls
General Ledger Controls dictate the Credit and Debit transactions to the General Ledger that are caused by this transaction.
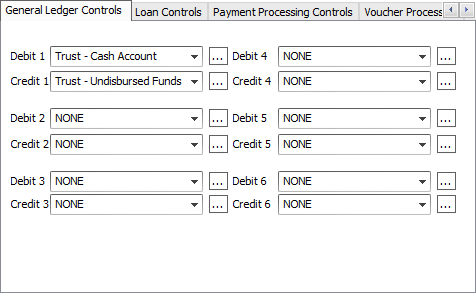
Usually there will be one Credit and one Debit for a single transaction, but there are some rare types of transactions that will prompt postings to multiple accounts.
Example
US Farm Equipment Financing Company has a main account for its lending reserves that is defined by the placeholder PHCash Account1. They give credit lines to farmers and the farmers take cash advances for livestock, feed, and equipment. USFEFC sets up a separate manual transaction for each of these kinds of advances. Their accounting department has set up a cash clearing account for livestock, feed, and equipment, and reconciles the amounts loaned for each by looking at the monthly total of debits to each account. These accounts don’t actually hold any balance, but funds must be funneled through them, and the company wishes to process just one transaction, not two. The Credits and Debits for the Livestock Principal Advance Transaction are:| DEBIT 1 | Livestock Clearing Account |
| CREDIT 1 | PHCashAccount1 |
| DEBIT 2 | PHLoanAsset1 |
| CREDIT 2 | Livestock Clearing Account |
PHCashAccount1, and PHLoanAsset1 are placeholders for accounts that are defined in the loan group. Livestock Clearing Account would be a specific account that USFEFC has set up on their ledger.
The credit and debit fields may be populated with placeholders, or with specific accounts. If populated with a specific account, that account will be credited or debited whenever that transaction is processed. If the field is populated with a placeholder, that placeholder will be matched to a specific account, on the loan group setup, for the loan group, to which the loan, on which the transaction is processed, belongs. That specific account will then be credited or debited by the transaction.
The Debit and Credit drop downs will only list the pre-defined placeholder accounts. Click  to choose a GL account that has been added in Setup > Loan Setup > GL Account Number.
Loan Controls
Loan Controls determine which Loan Balances and Statistical Entries are affected by the transaction.
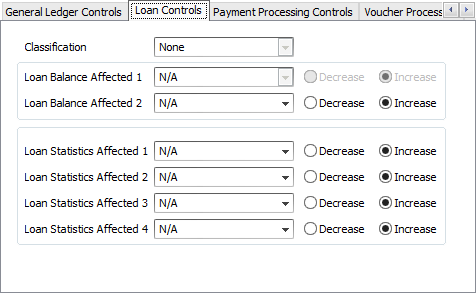
Transaction Classification is used to categorized and identify the transaction code in the ledger and reports.
A transaction could be configured to affect up to two Loan Balances, and up to four Statistics (e.g. the Capitalize Interest Transaction will decrease the Interest balance of the loan while it increases the Principal balance).
The loan balances affected may not be modified on default system transactions, although the statistics may. Be careful when modifying the statistics of a default transaction. If this is not done with great care and consideration, it could result in useless and nonsensical statistics.
Payment Processing Controls
All transactions that represent receivables or payments that satisfy receivables require Payment Processing Controls. These controls tell the loan system if the transaction in question generates a receivable item on the Payments Due tab of the loan query, or if it pays such an item, or if it does neither.
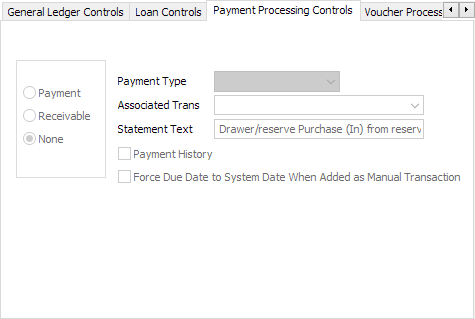
If the transaction is a payment or a receivable, it requires a Payment Type to be selected: principal, interest, late charge, or fee. All payments and receivables must have an Associated Transaction. The associated transaction for a payment is a receivable, and the associated transaction for a receivable is a payment. To be associated, the payment and receivable must have identical payment types.
The Statement Text field defines a text string to be placed on any report or statement that provides listings of these transactions.
If Payment History is selected, all instances of the transaction will be placed on the Loan Payment History tab of a loan query and on the Payment History Reports. All transactions go on the Transaction History tab and on Transaction Register reports.
NLS 5.25 and later
When Force due date to system date when added as manual transaction is selected, the due date of a manually posted receivable will be set as the current date and the resulting payment due record will not be linked to any existing payment due records on the loan. This option is only applicable to receivables and manually entered transactions.Voucher Processing
If a transaction generates a voucher (which will ultimately result in a check being printed from NLS) the setup for that voucher is configured on the Voucher Processing tab.
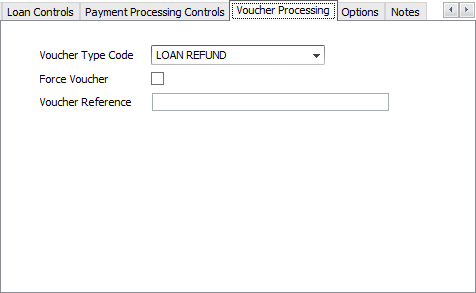
The Voucher Type Code drop down list is populated from the voucher code setup in the Disbursement setup.
If the force voucher checkbox is selected, then a voucher will be created whenever the trans code is run. If it is not selected, then the voucher checkbox will be present on the transaction entry screen, and the user may choose at that time if they need a voucher to be created.
The Voucher reference box contains data that is to be placed in the reference field of the voucher. This data may be a fixed string of characters, or may be a dynamic variable as listed below, or any combination thereof.
The variables that may be entered in the reference box are as follows:
%N
|
Account Name |
%L
|
Loan Number |
%I
|
Impound Invoice |
%A
|
Impound Account |
%R
|
Impound Reference |
%S
|
Shortname |
%D
|
Impound Description |
%a
|
Loan Acctrefno |
%U
|
User Reference |
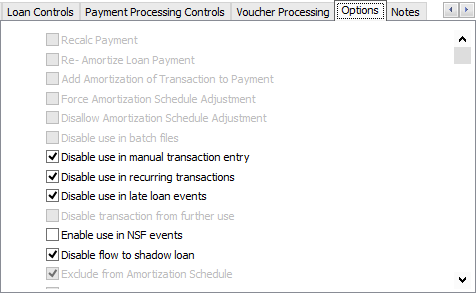
Options
These options control when and how a transaction code may be used, and may allow the transaction to induce a modification to the loan setup.
| Option | Description |
|---|---|
| Recalc Payment | The loan setup is modified, with a new payment override, which is derived using the amortizing equations, and based on the current balance, current interest rate, and remaining term. The loan can also be set up to do this automatically upon any rate change, principal advance, or principal reduction. |
| Re-Amortize Loan Payment | The amortization schedule is adjusted to reflect the current balance and rate. The loan can also be set up to do this automatically upon any rate change, principal advance, or principal reduction. Re-Amortize Loan Payment and Add Amortization of Transaction to Payment are mutually exclusive. |
| Add Amortization of Transaction to Payment | Amortizes the amount of the transaction over the remaining term and adds it to the current payment amount. Add Amortization of Transaction to Payment and Re-Amortize Loan Payment are mutually exclusive. |
| Force Amortization Schedule Adjustment | The amortization schedule of the loan will be adjusted when this transaction is run, regardless of the re-amortize settings on the loan. |
| Disallow Amortization Schedule Adjustment | The amortization schedule of the loan will not be adjusted when this transaction is run, even if the transaction is an advance or reduction, and the loan is set up to re-amortize on advances and reductions. |
| Disable use in batch files | This transaction code cannot be accessed through the transaction import procedure. |
| Disable use in manual transaction entry | This transaction code cannot be accessed from the loan account or from the transaction batch entry screen. |
| Disable use in recurring transactions | This transaction code cannot be executed through a recurring transaction. |
| Disable use in late loan events | This transaction code cannot be executed by a late loan event. |
| Disable transaction from further use | This transaction cannot be accessed by any means. It remains on the system in order to have an accurate setup for any transactions of this type, which were executed in the past. Any transaction code that was ever used on an existing loan account cannot be deleted. |
| Enable use in NSF events | Designates the transaction as an NSF fee. The transaction code must be a receivable. |
| Disable flow to shadow loan | If a shadow loan exists and has a setup that designates that all transactions executed on the parent loan should flow through to the shadow loan, this option makes the transaction an exception. Transaction with this trans code will never flow through to shadow loans. |
| Exclude From Amortization Schedule | The transaction will not be shown and considered in the calculations for an amortization schedule report created by NLS. This could cause strange results on that amortization schedule if this checkbox is selected on a transaction code that affects loan balances. |
| Ignore Credit Limit | This transaction code can execute even if in doing so would carry the balance of the loan above its credit limit. |
| Report as charge off to the credit bureaus | This transaction is designated as a charge off for the purpose of credit bureau reporting. |
| Include in Loan Aging | The transaction (generally a receivable) is used to help determine the past due status of the loan. |
| Include in APR Calculation | The transaction will be included in the loan amount for the purpose of determining the APR in the origination module. |
| The transaction will be excluded from the principal balance when a loan is rescinded. | |
| The transaction will be included in the scheduled monthly payment amount reported on the Metro 2. Manual fee billings are not included. | |
| When selected, the last payment date of non-principal and non-interest payments are not used in the calculation of the Date of Last Payment in a Metro 2. When unselected, the payment date of any payment type is used. Only available for payment processing type transaction codes. |
|
| The transaction is included in the origination fee in conjunction with the Georgia Industrial Loan Act Refund Rule. | |
|
Include in face value - GILA5.18+
|
The transaction affects the face value associated with the Georgia Industrial Loan Act. Note FACE VALUE of the loan includes the PreCompute Interest.PreCompute Interest accrues interest. Maintenance Fee does not accrue interest. If GILA is active, the interest (perdiem) will be calculated based on FACE VALUE, not the loan amount. |
| When selected, the IRS Write Off Event Code drop down list will appear in the Transaction Entry dialog for manual transaction type using this transaction code. |
Notes
The Notes tab displays the comments entered during the setup of a manual transaction.
See also:
