Loan Portfolio
NLS has 100 standard user-defined data entry fields available for use on every Loan. There are 50 on each of two forms: Loan Detail 1 and Loan Detail 2. Additionally, UDF #51 to #55 are available for use in a grid.
NLS 5.13 and later
UDF #56 to #80 has been added to each form for a total of 150 UDFs. The additional 25 UDFs on each form are hidden by default.Each Loan is placed into one of your Loan Portfolios. To add a new loan portfolio, click Add  and enter the portfolio code and description for the new loan portfolio.
If you do not configure any new loan portfolios, all loans will exist in a portfolio called <DEFAULT>.
Each portfolio has its own unique configuration for the 100 Loan User-Defined Fields. The label and type of each user-defined field is defined in the Loan Portfolio sub-category under Loan Setup.
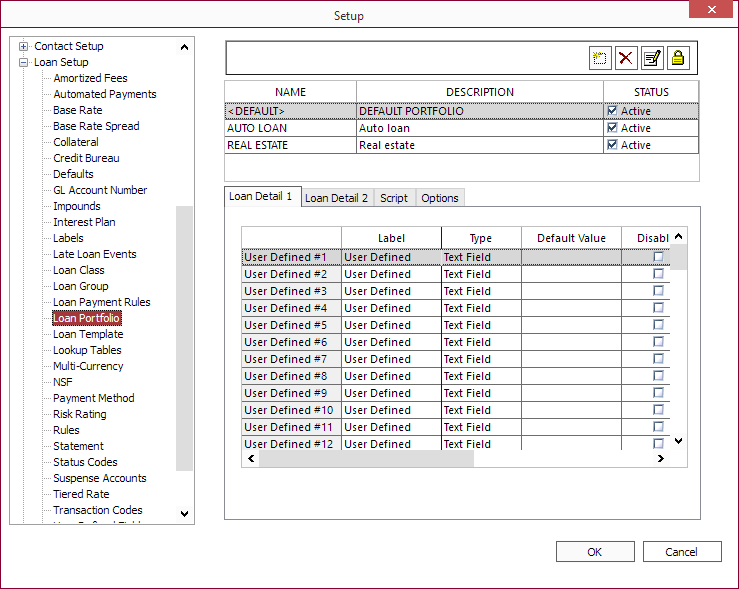
On the grid, you can modify the label, set the data type from the drop down list, set a default value, disable a field, make a field required, hide a field, make a field read only, set a field to allow mixed case, and access the advanced properties of the field.
Options Tab
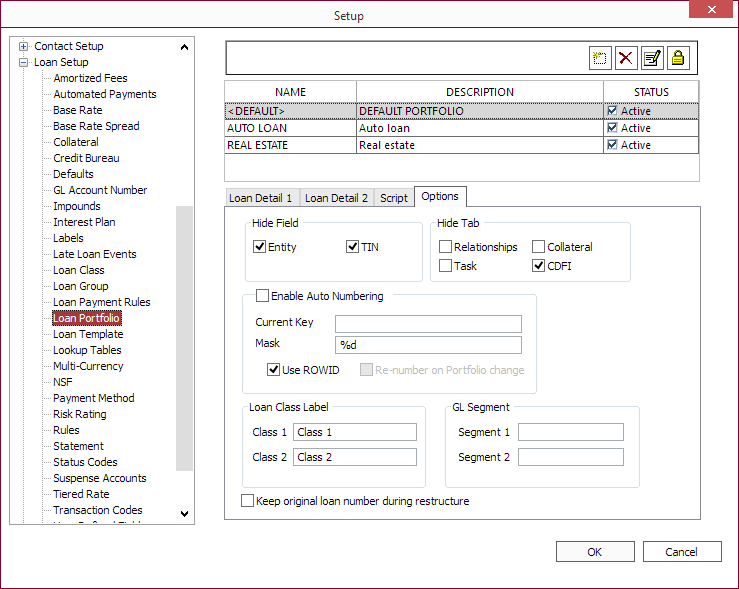
Hide Field
The Entity and Tax ID fields may be hidden on all loans that are in this loan Portfolio.
Hide Tab
Selecting this option next to the name of one of the standard tabs on the Loan will hide that tab for all loans that are set to this contact type.
Enable Auto Numbering
If Enable Auto Numbering is selected, you may set the auto numbering to be keyed to the reference number of the loan, or to a key that you set, which will iterate as each loan is added.
Mask
NLS 5.9 and later
Branch number and contact number may be included in the loan number by including a {B1} macro for branch or {CN} macro for contact number. These can be added to the mask by right clicking in the Mask field and selecting the appropriate macro from the list.The mask is formatted as follows: aaa%0#dbbb
where:
aaa = a string of characters to be placed at the beginning of the loan number
%0 = designates that the number 0 will be used to pad the refno or key
# = a number which indicates how many digits to pad
d = the actual character “d” indicates where the refno or key is to go, and it is padded based on the number which proceeds it and the character proceeding that number
bbb = a string of characters to be placed at the end of the loan number
EXAMPLE
If the mask were set toTHX%05d-R2D2 and the current key was 1138, then the next loan number would be THX01138-R2D2.
Class 1 Label and Class 2 Label
The Class 1 label and Class 2 label fields allows for the customization of the class labels. By default, the fields are labeled Class 1 and Class 2. Simply type in a new label and the new label will be used where loan classes are displayed for the selected loan portfolio. This only changes the label names as displayed and does not affect the actual loan classes as configured in the loan class setup.

Shows the default Class 1 and Class 2 labels for the default loan portfolio on a loan view.
NLS 5.6 and later
GL Segment
Values in Segment 1/2 are used to replace the corresponding placeholders in segmented GL numbers.
Export / Import
To export a loan portfolio to an XML file, right-click the loan portfolio to export and select Export to file. Enter a name for the file and select where to save then click Save.
To import a loan portfolio from an XML file, right click anywhere in the list of loan portfolios and select Import from file. Select the file to import and click Open.
