DocuSign
NLS 5.15 and later
NLS 5.26 or later is strongly recommended
NLS can be used to generate documents to be signed electronically using DocuSign. A DocuSign account is required to use this service.
Set Up NLS for DocuSign
Go to Setup > eSignature Platform.

Select DocuSign as the eSignature Platform and fill in the fields for the DocuSign account.
Before documents can be sent by NLS, consent must be given to NLS to send documents on your behalf. Consent only needs to be provided once.
To give consent to NLS, open the URL shown on the setup window by copying and pasting it into your web browser. If you are an ASP/Switch customer, use a web browser running locally on your computer. Log in to DocuSign with your email and password then click Allow Access to give consent to NLS to send documents. Make sure the email address used to log in to DocuSign is the same one associated with the user ID entered in the User ID field.
Click OK to relaunch NLS for the changes to take effect.
| Field | Comments |
|---|---|
| User ID | The User ID associated with the email address used to log into DocuSign. The User ID can be found in your DocuSign account’s user profile. |
| Web Service URL | Use account.docusign.com if this is not pre-populated. |
| Callback URL |
This is the webhook URL for listening to responses from DocuSign. For ASP customers, this URL will be provided to you by Nortridge.
For licensed clients, see DocuSign Webhook on setting up your own DocuSign webhook. Enter the URL from your webhook setup in the form of |
Go to Setup > eSignature Platform.
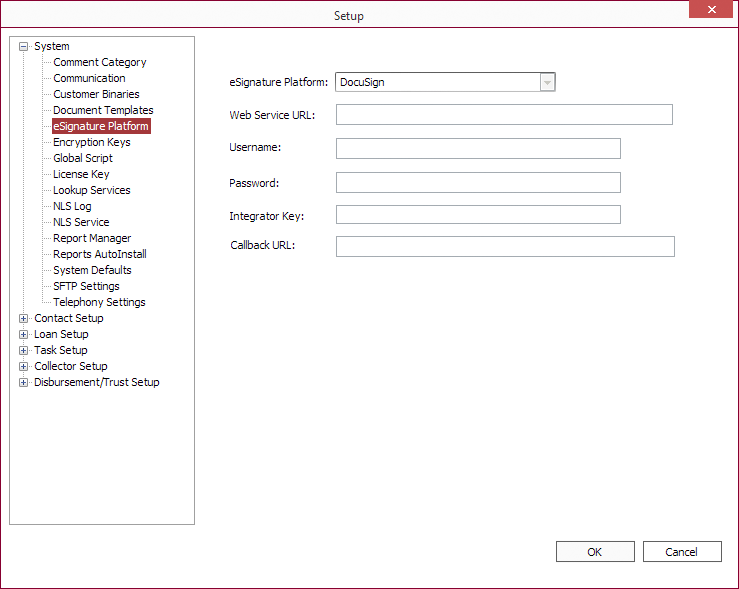
Select DocuSign as the eSignature Platform and fill in the fields for the DocuSign account. Click OK to relaunch NLS for the changes to take effect.
| Field | Comments |
|---|---|
| Web Service URL | The URL associated with your DocuSign account for API calls. This is provided by DocuSign. |
| Username | The username used to log into DocuSign. |
| Password | Password for the DocuSign account. |
| Integrator Key | This field is not used. |
| Callback URL |
This is the webhook URL for listening to responses from DocuSign. For ASP customers, this URL will be provided to you by Nortridge.
For licensed clients, see DocuSign Webhook on setting up your own DocuSign webhook. Enter the URL from your webhook setup in the form of |
Creating a DocuSign Document Template
NLS 5.21 and before
Documents sent through DocuSign must be a PDF file. When working with Word merge documents, convert it to PDF prior to importing it into NLS.NLS 5.22 and later
Word documents no longer need to be converted to PDF prior to importing it into NLS.The following keywords, enclosed within backslashes (\), in a document will be embedded with DocuSign entry fields when the document is processed by DocuSign. Up to five individual signers can be embedded in a document using the numeric designation.
| Keywords | Comments |
|---|---|
| n1 - n5 | Recipient’s printed name. |
| d1 - d5 | Date the document was signed. |
| s1 - s5 | Signature of the recipient. |
| i1 - i5 | Initial of the recipient. |
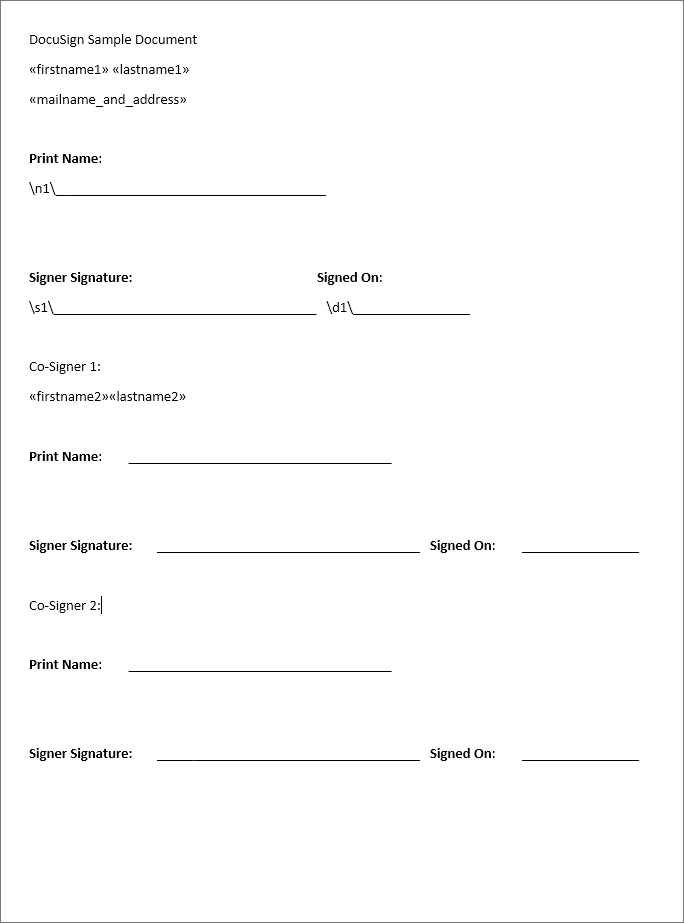
Sample Document with Word Merge Fields and DocuSign Keywords
The DocuSign keyword can be hidden from view by setting its font color to white. In the Sample Document, the keyword used for Co-Signer 1 and Co-Signer 2 are set to white.
Text boxes and check boxes may be made specific to a single recipient when the document is sent to multiple persons.
To set a text box for Person 1 (the primary recipient or r1) use \\r1_txtbx1\\ then \\r2_txtbx1\\ for recipient2 and so forth.
To set a check box for Person 1 use \\r1_ckbx1\\ then \\r2_ckbx1\\ for recipient2 and so forth.
Once the document has been created and saved, it will need to be added to NLS as a document template. See Installing the Document Templates on how to install document templates in NLS.
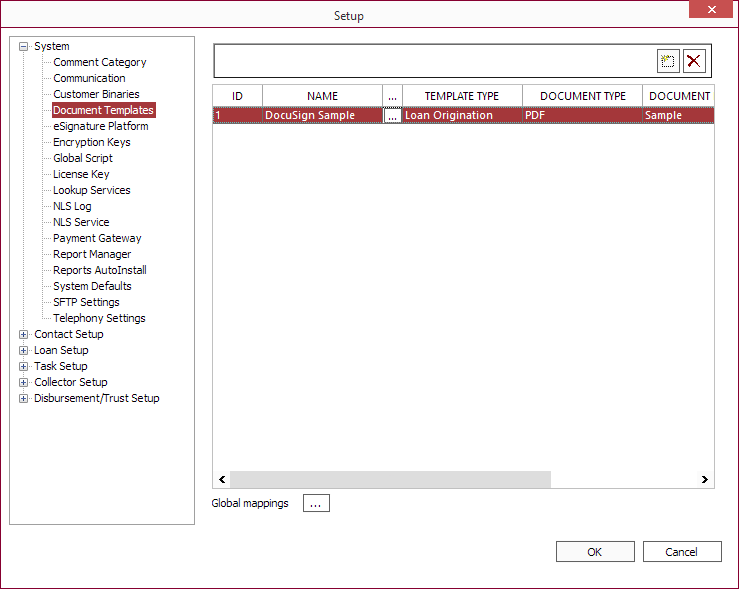
Set the template type to Loan Origination and the document type accordingly.
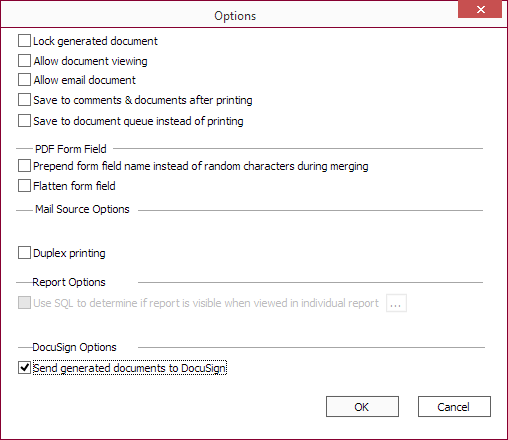
Click Global mappings  then click Options in the Advanced setting dialog and select Send generated documents to DocuSign at the bottom of the dialog.
DocuSign Configuration
NLS 5.43 and later
The following aspects of the DocuSign functionality can be configured via XML:
- Subject line of the email
- Name of the file being sent
- Number of days before the document is automatically voided
- Recipient routing order
- Set required text entry fields
This is optional and should only be configured if the default DocuSign behavior does not fit into your workflow.
Click  next to Send generated documents to DocuSign to set the properties for the DocuSign functionality using XML.
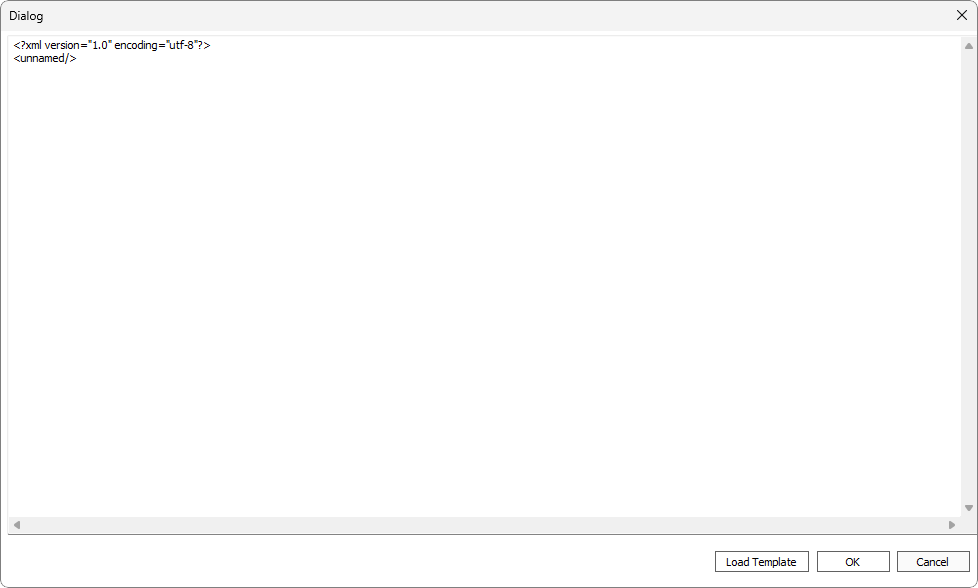
Click Load Template to load a XML template to use as a starting point. The following XML will populate the dialog.
XML Template
<?xml version="1.0" encoding="utf - 8"?>
<DOCUSIGN EmailSubject="Documents attached - Please review and sign" FileName="MortgageDocs.docx" ExpireAfter="3" DocumentId="1">
    <SIGNER>
        <SIGNHERE AnchorString="\\s1\\" AnchorIgnoreIfNotPresent="true" AnchorUnits="inches" TabLabel="Sign Here please"/>
        <DATESIGNED AnchorString="\\d1\\" AnchorIgnoreIfNotPresent="true" AnchorUnits="inches" TabLabel="Date here please"/>
        <FULLNAME AnchorString="\\n1\\" AnchorIgnoreIfNotPresent="true" AnchorUnits="inches" TabLabel="name here please"/>
        <INITIALHERE AnchorString="\\i1\\" AnchorIgnoreIfNotPresent="true" AnchorUnits="inches" TabLabel="initial here"/>
        <TEXTBOXES>
            <TEXTBOX AnchorString="\\r1_txtbx1\\" AnchorUnits="inches" TabId="r1textbox1" Required="true" TabLabel="write here" Width="4" Height="1.5" Locked="false"/>
            <TEXTBOX AnchorString="\\r1_txtbx2\\" AnchorUnits="inches" TabId="r1textbox2" Required="true" TabLabel="write here" Width="4" Height="1.5" Locked="false"/>
            <TEXTBOX AnchorString="\\r1_txtbx100\\" AnchorUnits="inches" TabId="r1textbox3" Required="false" TabLabel="write here" Width="4" Height="1.5" Locked="false"/>
        </TEXTBOXES>
        <CHECKBOXES>
            <CHECKBOX AnchorString="\\r1_ckbx1\\" AnchorUnits="inches" TabId="r1checkbox1" Required="false" TabLabel="check here1" Locked="false"/>
            <CHECKBOX AnchorString="\\r1_ckbx2\\" AnchorUnits="inches" TabId="r1checkbox2" Required="false" TabLabel="check here2" Locked="false"/>
            <CHECKBOX AnchorString="\\r1_ckbx100\\" AnchorUnits="inches" TabId="r1checkbox3" Required="false" TabLabel="check here100" Locked="false"/>
        </CHECKBOXES>
    </SIGNER>
    <COSIGNERS>
        <COSIGNER Order="1">
            <SIGNHERE AnchorString="\\s2\\" AnchorIgnoreIfNotPresent="true" AnchorUnits="inches" TabLabel="Sign Here please"/>
            <DATESIGNED AnchorString="\\d2\\" AnchorIgnoreIfNotPresent="true" AnchorUnits="inches" TabLabel="Date here please"/>
            <FULLNAME AnchorString="\\n2\\" AnchorIgnoreIfNotPresent="true" AnchorUnits="inches" TabLabel="name here please"/>
            <INITIALHERE AnchorString="\\i2\\" AnchorIgnoreIfNotPresent="true" AnchorUnits="inches" TabLabel="initial here"/>
            <TEXTBOXES>
                <TEXTBOX AnchorString="\\r2_txtbx1\\" AnchorUnits="inches" TabId="r2textbox1" Required="true" TabLabel="write here" Width="4" Height="1.5" Locked="false"/>
                <TEXTBOX AnchorString="\\r2_txtbx2\\" AnchorUnits="inches" TabId="r2textbox2" Required="true" TabLabel="write here" Width="4" Height="1.5" Locked="false"/>
                <TEXTBOX AnchorString="\\r2_txtbx100\\" AnchorUnits="inches" TabId="r2textbox3" Required="false" TabLabel="write here" Width="4" Height="1.5" Locked="false"/>
            </TEXTBOXES>
            <CHECKBOXES>
                <CHECKBOX AnchorString="\\r2_ckbx1\\" AnchorUnits="inches" TabId="r1checkbox1" Required="false" TabLabel="check here1" Locked="false"/>
                <CHECKBOX AnchorString="\\r2_ckbx2\\" AnchorUnits="inches" TabId="r1checkbox2" Required="false" TabLabel="check here2" Locked="false"/>
                <CHECKBOX AnchorString="\\r2_ckbx100\\" AnchorUnits="inches" TabId="r1checkbox3" Required="false" TabLabel="check here100" Locked="false"/>
            </CHECKBOXES>
        </COSIGNER>
        <COSIGNER Order="2">
            <SIGNHERE AnchorString="\\s3\\" AnchorIgnoreIfNotPresent="true" AnchorUnits="inches" TabLabel="Sign Here please"/>
            <DATESIGNED AnchorString="\\d3\\" AnchorIgnoreIfNotPresent="true" AnchorUnits="inches" TabLabel="Date here please"/>
            <FULLNAME AnchorString="\\n3\\" AnchorIgnoreIfNotPresent="true" AnchorUnits="inches" TabLabel="name here please"/>
            <INITIALHERE AnchorString="\\i3\\" AnchorIgnoreIfNotPresent="true" AnchorUnits="inches" TabLabel="initial here"/>
            <TEXTBOXES>
                <TEXTBOX AnchorString="\\r3_txtbx1\\" AnchorUnits="inches" TabId="r3textbox1" Required="true" TabLabel="write here" Width="4" Height="1.5" Locked="false"/>
                <TEXTBOX AnchorString="\\r3_txtbx2\\" AnchorUnits="inches" TabId="r3textbox2" Required="true" TabLabel="write here" Width="4" Height="1.5" Locked="false"/>
                <TEXTBOX AnchorString="\\r3_txtbx100\\" AnchorUnits="inches" TabId="r3textbox3" Required="false" TabLabel="write here" Width="4" Height="1.5" Locked="false"/>
            </TEXTBOXES>
            <CHECKBOXES>
                <CHECKBOX AnchorString="\\r3_ckbx1\\" AnchorUnits="inches" TabId="r1checkbox1" Required="false" TabLabel="check here1" Locked="false"/>
                <CHECKBOX AnchorString="\\r3_ckbx2\\" AnchorUnits="inches" TabId="r1checkbox2" Required="false" TabLabel="check here2" Locked="false"/>
                <CHECKBOX AnchorString="\\r3_ckbx100\\" AnchorUnits="inches" TabId="r1checkbox3" Required="false" TabLabel="check here100" Locked="false"/>
            </CHECKBOXES>
        </COSIGNER>
    </COSIGNERS>
</DOCUSIGN>
Specifying Additional Signers
The AnchorString attribute is used to designate the recipient of the document. The primary signer is \\s1\\, co-signer 1 is \\s2\\, co-signer 2 is \\s3\\, etc….
To add additional signers, specify a unique AnchorString
Example
<SIGNHERE AnchorString="MySignaturePlaceholder" AnchorIgnoreIfNotPresent="true" AnchorUnits="inches"/>
MySignaturePlaceholder is the keyword used in the Word document. Your own AnchorString attribute can be used with <SIGNHERE>, <DATESIGNED>, <INITIALHERE>, <FULLNAME>, <TEXTBOXES>, and <CHECKBOXES> elements.
Email Subject Line
The EmailSubject attribute in the <DOCUSIGN> element defines the subject line used for the email sent to recipients.
Document Filename
The FileName attribute in the <DOCUSIGN> element defines the filename to use for the attached DocuSign document.
Auto Void Days
The ExpireAfter attribute in the <DOCUSIGN> element defines the number of days after the document is sent that the document will automatically be voided. The default value set by NLS is 120 days.
Each document’s expiration date can be verified by checking the status of the document in your DocuSign account.
Recipient Sequence
The sequence in which the recipients receives the document can be set using the RoutingOrder attribute that is specified within the <SIGNER> and <COSIGNER> elements.
Example
Send the document to co-signer 2 first, then to the primary signer, and finally to co-signer 1.<?xml version="1.0" encoding="utf - 8"?>
<DOCUSIGN EmailSubject="Documents attached - Please review and sign" FileName="MortgageDocs.docx" ExpireAfter="1" DocumentId="1">
<SIGNER RoutingOrder="2">
.
.
.
</SIGNER>
<COSIGNERS>
<COSIGNER RoutingOrder="3" Order="1">
.
.
.
</COSIGNER>
<COSIGNER RoutingOrder="1" Order="2">
.
.
.
</COSIGNER>
</COSIGNERS>The Order attribute in the <COSIGNER> element is used to reference contacts listed in the task origination tree in NLS.
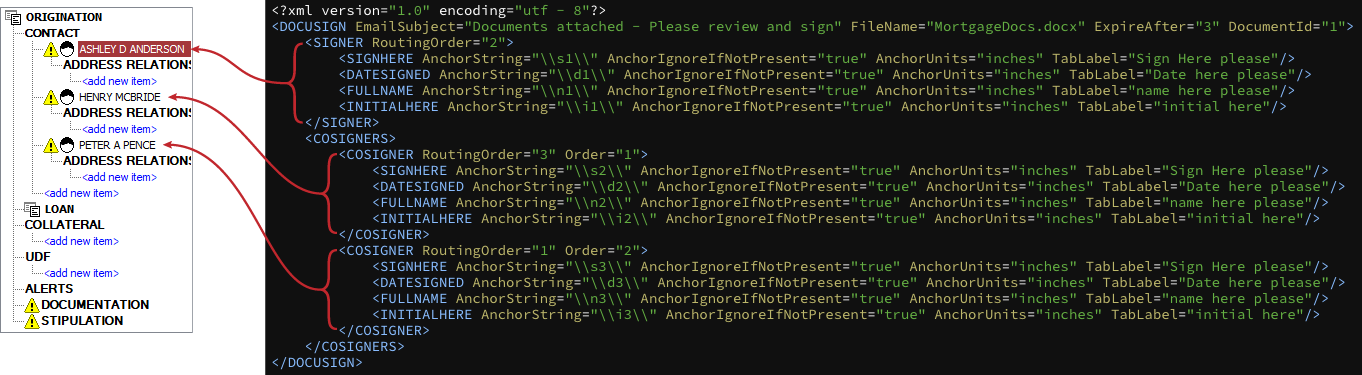
The first contact is always the primary signer assigned to the <SIGNER> node and the Order attribute is not used. Additional contacts are assigned the <COSIGNER> nodes in the order that they are listed in NLS. The second contact listed in NLS is considered co-signer 1 and is referenced as Order="1" and the third contact is Order="2" and so forth. By changing the Order attribute, that <COSIGNER> node can be assigned to a different co-signer contact.
Set Required Fields
The Required attribute can be set to false (not required) or true (required) for each field. When the Required attribute is set to true, the recipient will not be able to complete the document until the required fields are filled in.
According to the current DocuSign specification, checkboxes will always be optional regardless of its Required attribute setting.
Creating a Task for DocuSign
The installed DocuSign document template is linked to a task so that the document is sent to DocuSign when the task is completed.
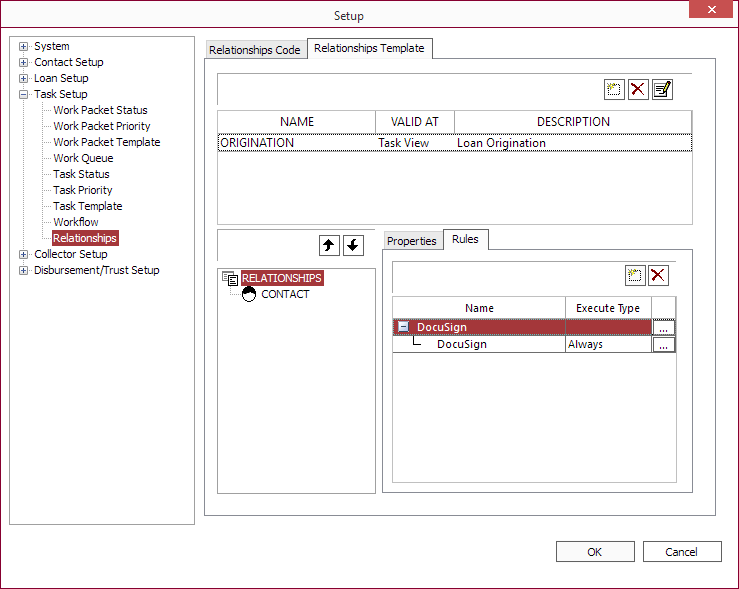
Go to Setup > Task Setup > Relationships and add a Relationships Template valid at Task View.
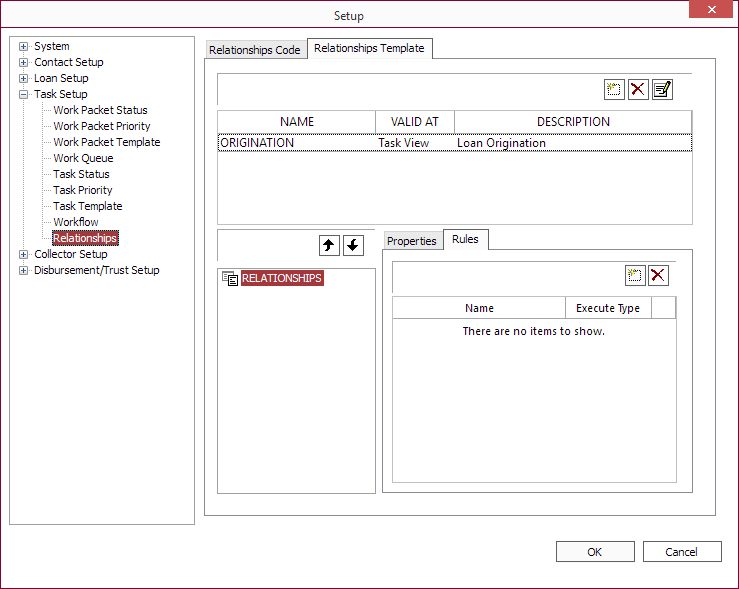
Click  in the Rules tab to create a rule to Print a document.

Click document and select the DocuSign document template installed previously.
Click Next to finish creating the rule.
Right click on RELATIONSHIPS and add a contact relationship code to the relationships template so that a recipient of the DocuSign document may be assigned to the task.
Assign the newly created relationship to a task template. When a new task is created, a Documentation item will be created in the task’s relationship tab for DocuSign.
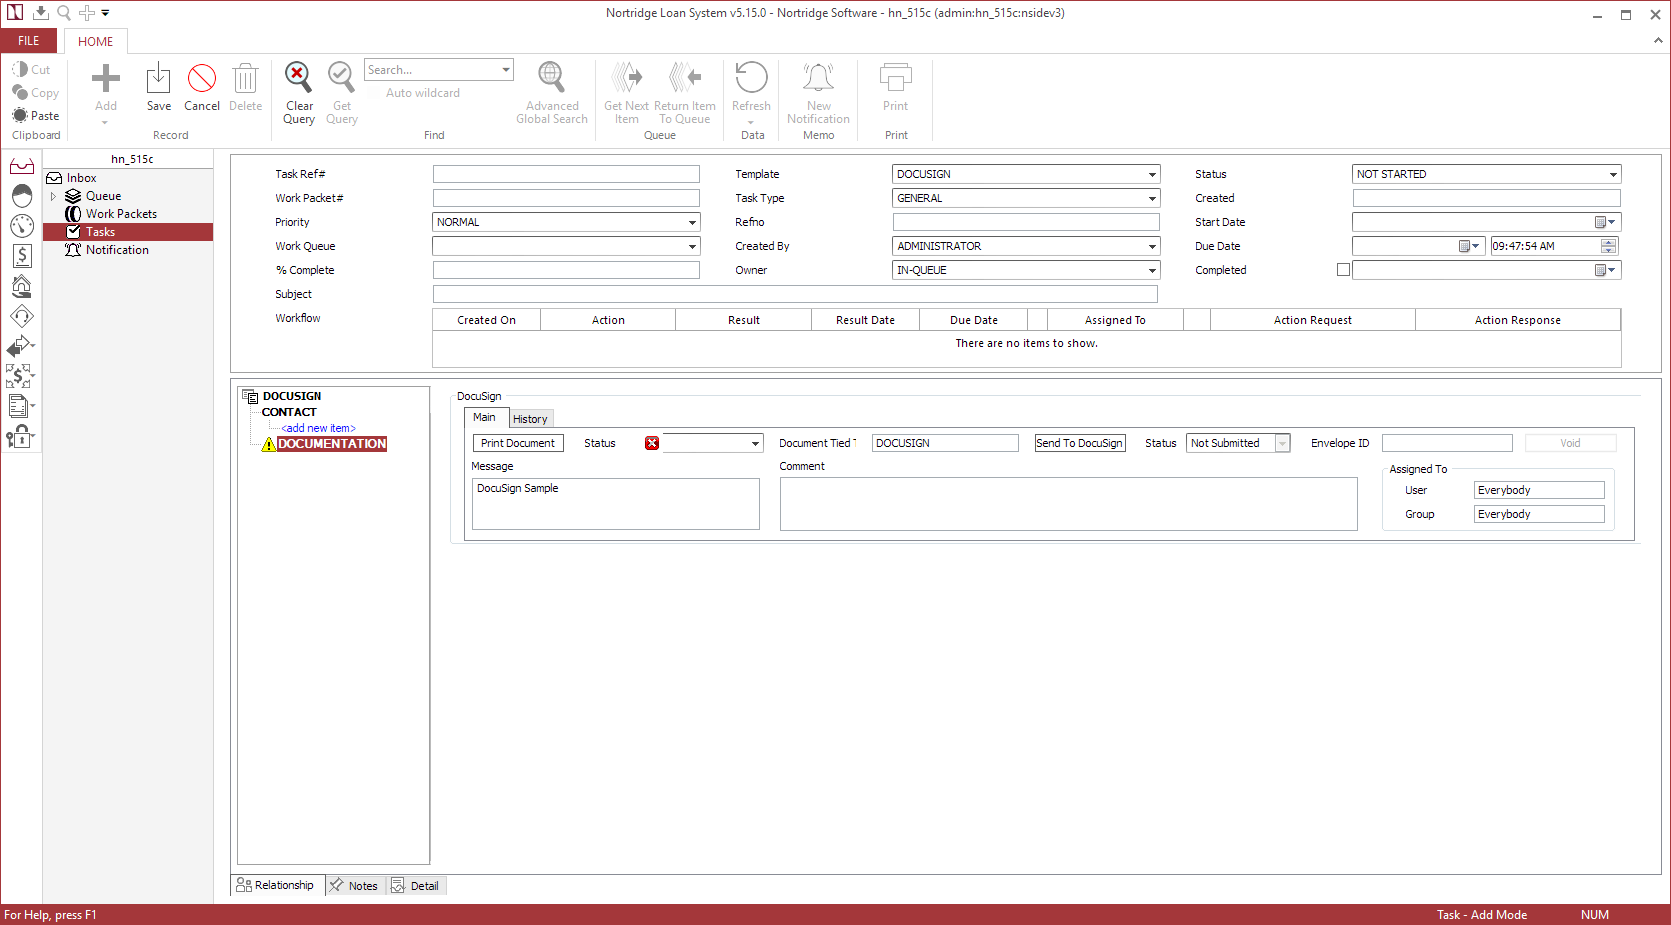
Add a contact to which the DocuSign document is to be sent. Make sure the contact has a full name and a valid email address entered in the database.
Click Send To DocuSign to send the document to the recipient. Click OK when the Print dialog appears.
Once the document is submitted to DocuSign the Status will change to Sent and an Envelope ID field will be populated.
| Code | Name | Description |
|---|---|---|
| 0 | Not Submitted | The document has yet to be submitted to DocuSign. |
| 1 | Sent | The document has been sent to all recipients but not necessarily viewed by all recipients. |
| 2 | Delivered | All recipients have viewed the document but not necessarily signed the document. |
| 3 | Completed | All recipients have viewed and signed the document. The signed document is saved within the task. |
| 4 | Declined | At least one recipient has declined to sign the document. |
| 5 | Voided | Sender has voided the document. |
Voiding a Document
Once a document is sent, the Void button will become available. A document can only be voided while the status of it is either Sent or Delivered. A document cannot be voided once it has been Completed.
