Collection Code
The Collection Code defines the type of actions to be taken by the loan system based on the Action and Result codes that were selected from the drop down lists during the collection process.
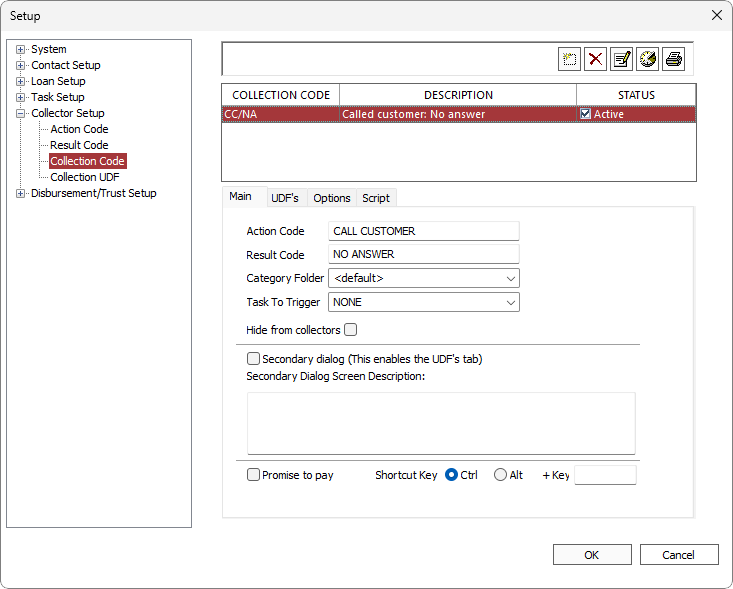
Each collection code must be defined with a unique combination of Action Code and Result Code. When that combination is selected during the collection process, the actions associated with this Collection Code (Secondary Dialogs, Promise to pay, and Scripting) will automatically be executed.
Select Hide from collectors to prevent the Action Code and Result Code from being displayed to other users.
The collection comments for this collection code will be specified in the comments and documents folder specified in the Category Folder field.
The buttons along the top of the Collection Code Setup screen are:
 Add Add |
Adds a new Collection Code to the list. |
 Delete Delete |
Removes the Collection Code from the list. If the result code is used in a Collection code definition, it cannot be deleted. |
 Modify Modify |
Allows you to change the description of the selected Collection Code. |
| Shows a list of the changes that have been made to the collection code. Changes to UDFs and scripts are not tracked. | |
 Print Print |
Prints a list of all Collection Codes and their descriptions. |
 Modification History
Main
The Main tab of Collection Code setup contains the Action and Result Code combination which causes this Collection Code to be executed, checkboxes for Secondary dialog and Promise to pay, and a Secondary Dialog Screen Description field.
If Secondary dialog is selected, then during the collection process, any time this Collection Code is executed (by the selection of the appropriate Action and Result Codes) a secondary dialog will pop up to allow the user to enter information required for this collection action. The fields on the secondary dialog are defined on the UDF’s tab.
If Promise to pay is selected, then during the collection process, any time this Collection Code is executed (by the selection of the appropriate Action and Result Codes) a special promise to pay dialog will pop up. This will allow the entry of date and amount for the Promise to pay, as well as allow the promise to be linked to an existing receivable.
Examples of Secondary dialogs and Promises to pay will both be shown in action in Collector Mode.
UDF’s
The UDF’s tab of the Collection Code setup is where the fields on a secondary dialog are configured.
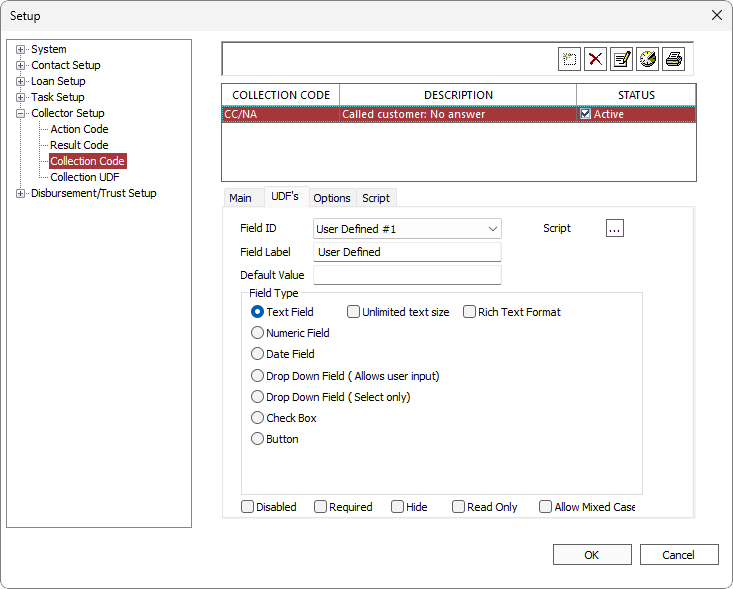
These user-defined fields are configured similarly to other user-defined fields in NLS.
For more information on the practical use of a Secondary Dialog, see Collector Mode.
Options
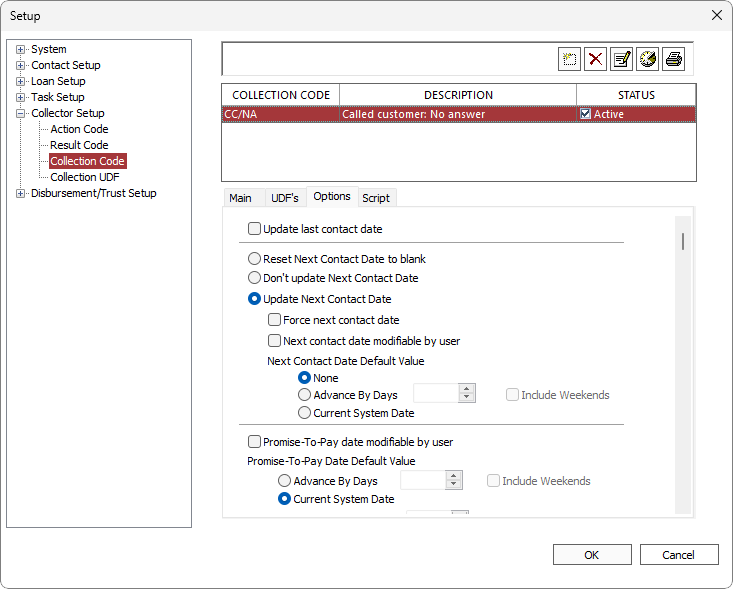
| Update Last Contact Date | The last contact date field of the collection status for this account is updated to today’s date whenever a collection code with this checkbox selected is activated. | ||
| Update Next Contact Date |
|
||
| Promise-to-Pay Date Modifiable by User | The promise to pay date, as defined by the default settings, may be overridden by the user. | ||
| Promise-To-Pay Date Default Value | Date to be used when a PTP is created.
|
||
| Sets the maximum days into the future that a PTP date can be assigned. | |||
| Threshold, in percentage of the promised amount, at which a promise is kept.
Example If the threshold is set to 98% and the promise to pay amount is $100.00, a payment of $98.00 or greater will consider the promise as being kept. A payment less than 98% is considered promise broken.To disable the threshold, set the value to 100%. Calculated value is rounded to the second decimal place. |
|||
| Number of days after the promise date that a payment can still be considered as promise kept.
Example If the promise to pay date is January 20th and the grace period is set to 2, a payment made on January 22nd is still considered as promise kept. A payment on January 23rd is considered promise broken.To remove the grace period, set to 0 days. A broken PTP will be considered kept when backdating a payment to fall within the grace period. |
|||
| Category Modifiable by User | All collection comments will go into the collection comments folder as well as one normal comment category as defined on the main tab of the collection code. This option allows the user to override which comment category the particular collection action’s comment is stored in. | ||
| Show Phone Name and Phone Number | Fields for phone name and phone number are displayed prominently at the bottom of the form that will pop up for the collector to fill out. The contact phone number field will be blank unless Automatically Fill in Phone Number is also selected. If Phone Number Modifiable by User is selected, the field will be open for the user to fill in the phone number.
Note A setup where the Phone Number field is shown, but NOT automatically filled in, and where the phone number is NOT modifiable by the user will result in a blank field in which the user cannot enter any data (i.e. a useless field). |
||
| Automatically Fill in Phone Number | The previous checkbox must also be selected for this to have any effect. The phone number field which is shown will be populated with the primary phone number from the contact. | ||
| Phone Number Modifiable by User | The option to show contact name and phone number must be selected for this to have any effect. Selecting this option allows the phone number to be entered into the field, and if the field was automatically filled in, allows the user to override that phone number. | ||
| Automatically Put the Phone Number in the Comment | When the collector comment is saved, the phone number will be placed in the comment. If the phone number was shown on the collection and if the user was allowed to modify it, the phone number placed in the comment will be as modified by the user. | ||
| Reject if Active Promises Exist | If there is an unexpired promise to pay on the loan, this combination of action and result code will not be allowed. | ||
Selecting this option enables the ellipsis button—allowing for the entry of multiple PTPs—next to the Promise Amount field in the Promise to Pay dialog.
|
Script
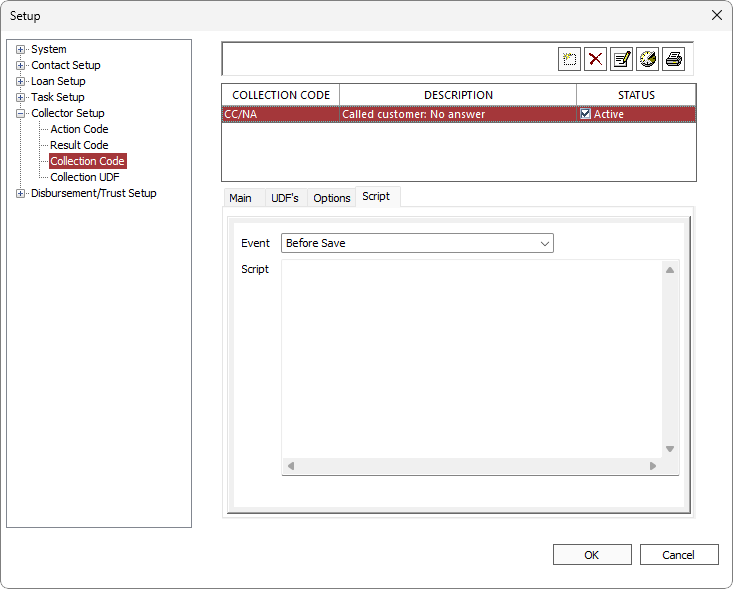
Visual Basic scripting can be added directly to a Collection Code. If VB Scripting exists on a Collection Code, the program sequence defined by that script would be executed whenever a collection action using this Collection Code is run (by the existence of Action and Result Codes in the proper combination).
For detailed information on scripting, see Scripting.
Export / Import
NLS 5.37 and later
To export a collection code to an XML file, right-click the collection code to export and select Export to file. Enter a name for the file and select where to save then click Save.
To import a collection code from an XML file, right click anywhere in the list of collection codes and select Import from file. Select the file to import and click Open.
