Transaction Entry
To enter a transaction from a loan query, click Transaction Entry ![]() .
.
If the daily accruals on the loan are not up to date, you will be prompted to run accruals for this particular loan. This will not affect any other loans in the portfolio. Click Update to run the accruals.
You will be brought to the Transaction Entry screen.
Select the transaction from the Transaction Type drop down list.
If today’s date is not the correct date for the transaction, enter the date in the Effective Date field.
The GL Date is the current system date by default. The behavior of this field can be configured in Setup > Loan Setup > Defaults > General Ledger.
You may select a payment method from the Payment Method drop down list.
The Payment Method Reference field is handy for entering identifiers such as check or money order number.
Enter the amount of the payment in the Amount field. You will be entering the amount the customer is actually paying, not the amount due. The system will account for overpayments or underpayments according to the loan’s default distribution. When you hit Enter on the keyboard the payment will be distributed between Principal, Interest, Late Charges, Fees, and Miscellaneous balances; and between Past Due Receivables, Current Receivables, and unbilled balances.
NLS 5.43 and later
Zero amount transactions are not counted as individual payments for the purposes of the last payment amount and date fields. Neither of these fields are updated when a zero amount transaction is made.You can enter any other desired payment reference information in the Reference field.
Distribution Tab
The default distribution may be overridden by changing the numbers in the Payment Distribution fields. You will not be able to finalize the payment until the payment is in balance, so if you reduce the amount in one field, another field must be increased by the same amount. You can never distribute more money to one of these fields than is available in the corresponding billing field to the left, so you can not distribute to Past Due Interest if there is no existing Interest Receivable past due.
Detail Tab
If there is more than one billed payment outstanding, and you need to control which specific payment is affected, you can do so by clicking the Detail tab.
From here, you can control the distribution on an individual payment level.
Payoff
Select Payoff to pay off a loan.
When a loan is paid off, the system will automatically write-off any balances in excess of the amount of the payment. If the payment is in excess of the payoff amount, the excess will go to suspense. After a loan has been paid off, it will either have all zero balances or will be left with nothing but a balance in suspense.
Select Set Loan Status = CLOSED to close the loan when the payoff transaction is made.
NLS 5.43 and later
When entering a zero amount payoff transaction, a zero amount interest transaction will be recorded without a GL entry. This is to allow the payoff date of the loan to be cleared when the zero payoff transaction is reversed.IRS Write Off Event Code
NLS 5.20 and later
The IRS Write Off Event Code drop down list will appear when Payoff is selected or if the transaction code used for a manual transaction is configured with the option to Trigger IRS Event Code.
This option is not applicable to commitment loans.
![]()
If an IRS event code for form 1099-C is required, select the appropriate event code from the IRS Write Off Event Code drop down list. The selected code will be printed on form 1099-C Box 6 (Identifiable event code). A write-off code is only needed if the write-off is $600.00 or more.
Select BLANK = Not Applicable to skip adding a write-off code. These write-offs are still counted towards the year’s sum of write-offs.
Advanced…
NLS 5.19 and later
Available only for Payment transaction types. The information entered will be used for the IRS Form 8300.
Clicking Advanced… will display a Paid By dialog for designating a payment as being paid by someone other than the borrower. The Paid by selection is comprised of contacts related to the loan and those designated as a trustee in the bankruptcy setup.
NLS 5.26 and later
The Paid By dialog is also available for Principal Reduction, Interest Reduction, and Manual Transaction payment types.
Additional payer information may be captured for the transaction. This may be required as configured for the selected payment method.
| Option | Description |
|---|---|
| Paid By Borrower | Indicates that the payment was made by the borrower of the loan. |
| Paid By | Indicates that the payment was made by a trustee or a contact related to the loan. |
| Paid By Other |
Indicates that the payment was made by someone other than the borrower. SSN is required and cannot be a duplicate of an existing contact. A new contact with the specified information will be created with the correlating relationship to the borrower of the loan.
Note “000000000” or “999999999” maybe entered in the SSN field if the specified Contact Type has its TIN field hidden and is not used. |
When all the values and options you have entered are correct , click OK to commit the transaction.
Your payment may be viewed on either the Payment History tab or the Transaction History tab of a loan query.
If a late billing generated a late fee, and a payment which is applied to that billing is back-dated to prior to the expiration of the grace period, the late fee will be reversed automatically by the system.
 Quick Payment
NLS 5.8 and later
Quick Payment is a simplified transaction entry dialog that does not include the payment distribution and other options available in the standard transaction entry dialog.
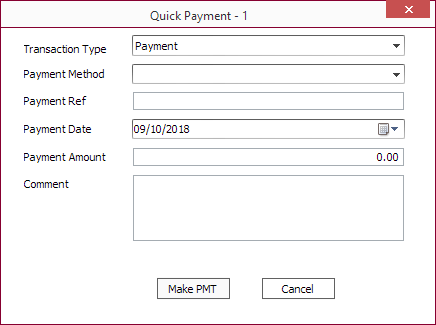
The Payment Method* drop down list will include all payment methods with the Quick Payment flag set in Payment Methods setup.
Security for Quick Payment is available in Loan > Quick Payment. User without the privilege will not see the Quick Payment icon in the ribbon bar.
*Prior to NLS 5.9 Payment Method was labeled Payment Type.
 Bulk Payments
NLS 5.11 and later
A bulk payment allows for a single transaction to be distributed among multiple loans.
From a loan query, click  Bulk Payments > Add… to enter a bulk payment.
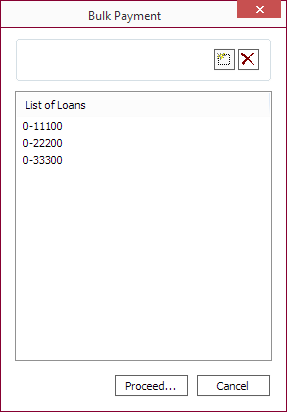
Edit the list of loans to which to apply the bulk payment.
| Button | Description |
|---|---|
 Add Add |
Use the Find Loan dialog to find loans to add to the list. |
 Delete Delete |
Remove selected loan from the list. |
Click Proceed… when all the loans to be included in the bulk payment has been added.
![]()
Enter the necessary transaction information and the payment amount. The payment amount will be distributed among the loans listed in the Loan Distributions tab. The amount will be divided equally among the loans to two decimal places with any left over amount being applied to the loan at the top of the list.
Distribution details for individual loans can be viewed and modified by clicking  under the Details… column for each loan.
Click OK and the transaction amounts will be applied to the loans.
Reversing a Bulk Payment
To reverse a bulk payment, click Bulk Payments > Reverse…. Only bulk payments from which the currently selected loan received a payment will be listed.

Note
When a bulk payment is reversed—payments made to all loans included in the bulk payment—will be reversed.Select the payment to reverse and click OK to reverse the bulk payment.
