Processing
 Transaction
Click  Processing and select
 ![]() Transaction to bring up the transaction batch-processing screen.
Transaction to bring up the transaction batch-processing screen.
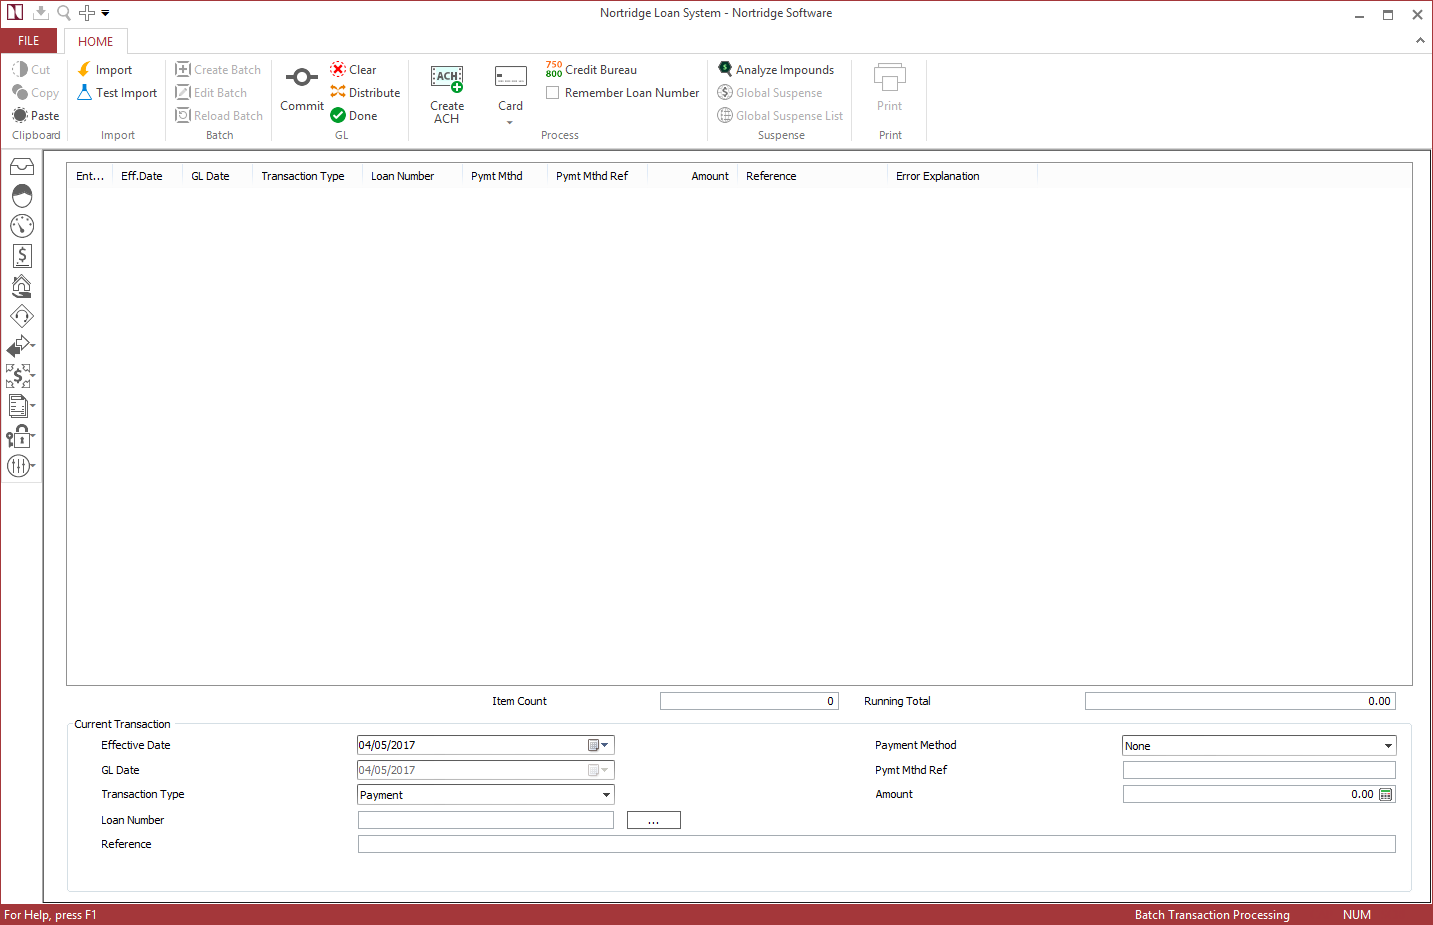
From this screen, you can enter payments through a batch process or through an import file.
Batch entry is useful when you have payment stubs that include the Loan Number. If you do not have the loan number handy, you can query for the loan number by clicking  next to the Loan Number field and entering a search criteria. This will generate a list of loans from which you may pick the loan that you are looking for.
NLS 5.43 and later
To copy the data in a cell to the clipboard, right-click the cell and select copy.The toolbar buttons shown below are unique to the Batch Processing Screen:
 Commit Commit |
The parameters that have been entered for the payment are instantly and immediately committed and the payment is processed according to the default distribution setup of the loan. |
 Distribute Distribute |
The payment is partially processed with the entered parameters. A distribution screen will come up so that you may view the default distribution, and if necessary, modify the distribution before committing the payment and completing the processing. |
|
|
Any payment parameters that have been entered in the Loan Number, Reference, Payment Method Reference, and Amount fields are cleared out. The Date, Transaction Type, and Payment Method fields remain as you have set them. |
 Done Done |
A report of the batch transactions in the list is sent to the printer and the list is cleared. |
 Import Import |
Clicking this button allows you to browse your computer to select a payment processing batch file to import. The file types supported are XML, delimited ASCII, Western Union, Money Gram, and ACH Reversal. |
 Test Import Test Import |
Clicking this button allows you to browse your computer to select a payment processing batch file. That file is then scanned to check that the format of each payment is correct. The payments are not actually entered, but from the test you will know if the system will be able to successfully import every payment in the file. This allows you to fix any improperly formatted payments and ensure a good payment-processing file before you attempt the actual import. |
NLS 5.21 and later
Right-click on the column label of the table to choose which columns to show or hide.Card Payments
To batch process card payments, click  Card and select Process.
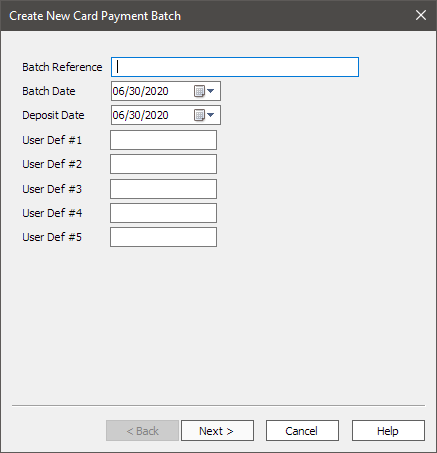
Enter a Batch Reference number for the batch, a Batch Date, and a Deposit Date. Up to five user-defined fields, pre-configured in Setup > Loan Setup > User Defined Fields, may also need to be filled in as required.
Click Next > to continue.
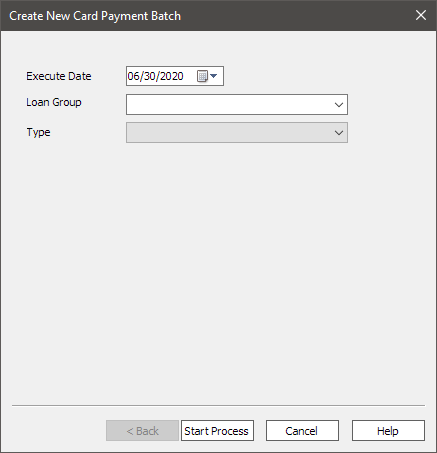
All loans that have card draws scheduled for the Execute Date will be included in this batch.
Select one or more loan groups for which to run this batch on for the selected date. If no loan groups are selected, all loans with scheduled card processing will be processed.
Select the transaction event type to process with this batch.
Click Start Process to initiate the batch process.
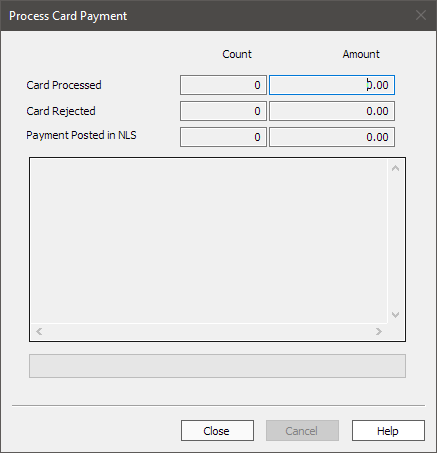
The dialog will display the progress and status of the batch process. When completed, click Close.
To re-run card payments that were declined, click Card and select Re-run Declined Card Transactions. The procedure for selecting the batch to process is the same as the one for all card transactions. Only declined card transactions that have never been re-run in the past are processed.
 Accrual
Accrual processing on NLS should be run at the end of each day.
Every loan has a setting which determines if that loan’s accruals are to be run at the beginning or at the end of the day. In actuality, all accrual processing should be run at the end of the day. Loans which have beginning of day settings will run the accruals for the next day. Loans which have end of day accrual settings will run their accruals for the day just concluded.
Example
A portfolio has 50 loans numbered 1 - 50. Loans 1 - 25 are set to beginning of day accruals and loans 26 - 50 are set to end of day accruals. On May 26th, after all payments have been entered for the day, the interest accrual run is started. Loans 1 - 25 run their interest accruals for the 27th. Loans 26 - 50 run their interest accruals for the 26th.During the accrual processing run, the following events occur for each loan:
-
Pending transactions scheduled for the current accrual date are posted as payments if the loan is set to beginning of day accruals.
-
Daily trial balance entries are created for the loan if it is set to beginning of day accruals, as the loan accrued today’s accrual during last night’s processing run.
-
Impound payments are processed.
-
The system checks the loan’s list of interest steps, variable rate information, and base rate schedules, and executes a rate change if one is called for.
-
The system checks the loan’s list of recurring transactions and executes any events that are scheduled for the current date if the recurring transaction is flagged to occur “Before Accrual.”
-
If the next billing date for the loan is the current accrual date, the next payment is billed and the projection for the following payment calculated.
-
If there is a custom payment schedule, it is checked to see if any special billings are scheduled for this day.
-
If the next statement date for the loan is the current accrual date, a loan statement is sent to the print queue.
-
The list of past due payments on the loan is checked against the loan’s late fee schedule to see if any past due events have been triggered.
-
Interest is compounded on loans with a compound interest rate if the current accrual date is the scheduled date of compounding.
-
If a promise to pay exists with an expiration date on the current accrual date, and the promise has not been satisfied, the promise is flagged as broken.
-
One day’s interest is accrued on the loan. If the loan is set to end of day accruals, today’s interest is accrued. If the loan is set to beginning of day accruals, tomorrow’s interest is accrued.
-
The loan’s statistics are updated.
-
Pending Transactions scheduled for the current accrual date are posted as payments if the loan is set to end of day accruals.
-
The system checks the loan’s list of recurring transactions and executes any events that are scheduled for the current date if the recurring transaction is flagged to occur “End of Accrual.”
-
Amortize fees are processed if scheduled to do so on the current accrual date.
-
Daily trial balance entries are created for the loan if it is set to end of day accruals.
To run the daily accrual processing, begin by clicking Processing >  Accrual on the shortcut bar.
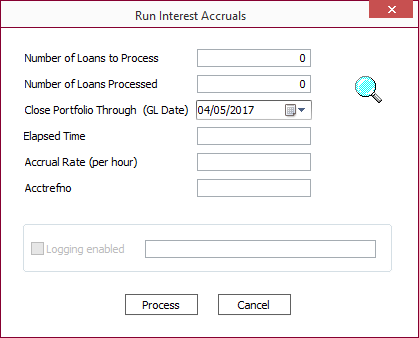
The Date to Accrue Through field is automatically set to the current date. When you process these accruals, the system activity will be finished for the day, so it is important that your data entry be complete for the day before running the end of day processing.
To process the accruals, click Process.
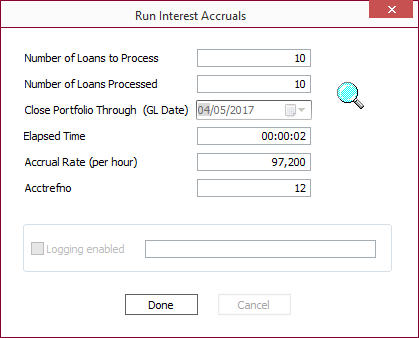
The Accrual Rate (per hour) is calculated by the following formula:
(Accruals processed / Elapsed time in seconds) * 3600
When the accrual processing is finished, click Done.
 Modify GL
The Modify GL screen allows the user to change the general ledger accounts posted to for past transactions stored in the system.
To modify the GL accounts, begin by clicking Processing >  Modify GL on the shortcut bar. This will bring up the Modify GL screen.
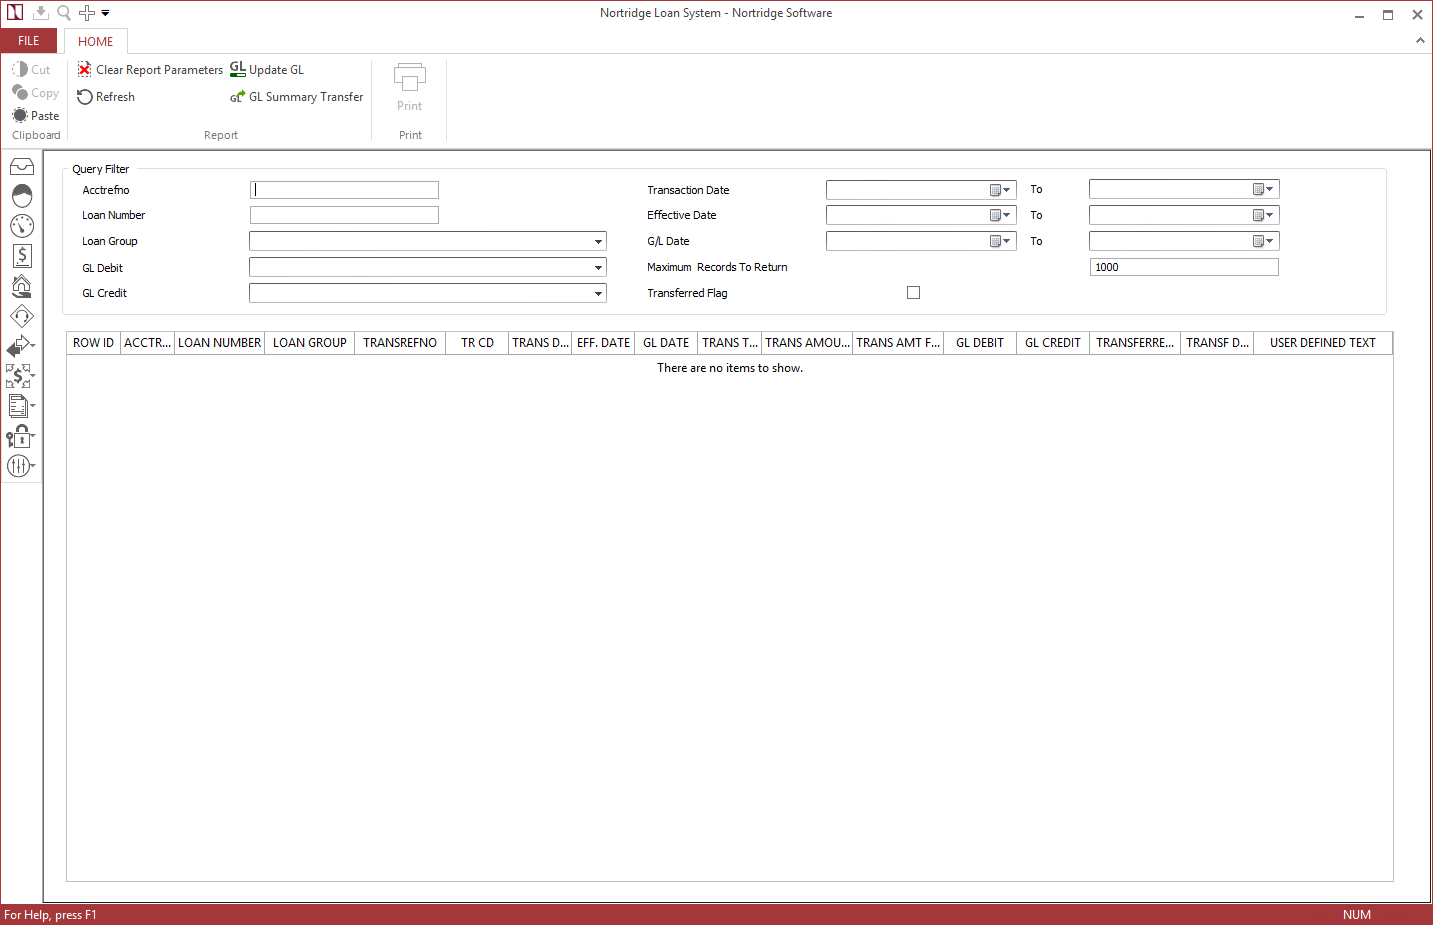
Enter the desired search criteria into the Query Filter section to find the desired transactions.
Example
If the transaction is known to have occurred between July 1st and July 5th 2002, enter 07/01/2002 in the Transaction Date field and 07/05/2002 in the Transaction To field.If NLS is interfaced to an external general ledger accounting package, you may select the Transferred Flag checkbox to query only transactions that have been transferred to the GL accounting package.
The number of transactions returned by the query may be limited by entering a number in the Maximum Number of Results to Return field. The default is 1,000 a maximum of 1,000 transactions returned.
Once all of the desired search parameters are entered click  . The query results will then be displayed in the grid below the Query Filter area.
Select the desired transaction from the grid and click  Update GL to open the Modify G/L dialog box.
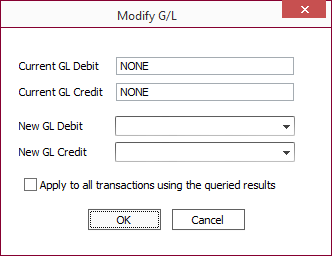
Select the desired debit and credit accounts to which to post the transaction. If you wish to affect all of the currently queried transactions select the Apply to all transactions using queried results checkbox.
Click OK to commit the change.
 GL Interface
The custom general ledger interface specified in Setup > Loan Setup > Defaults > GL Interface Object Name is loaded and displayed.
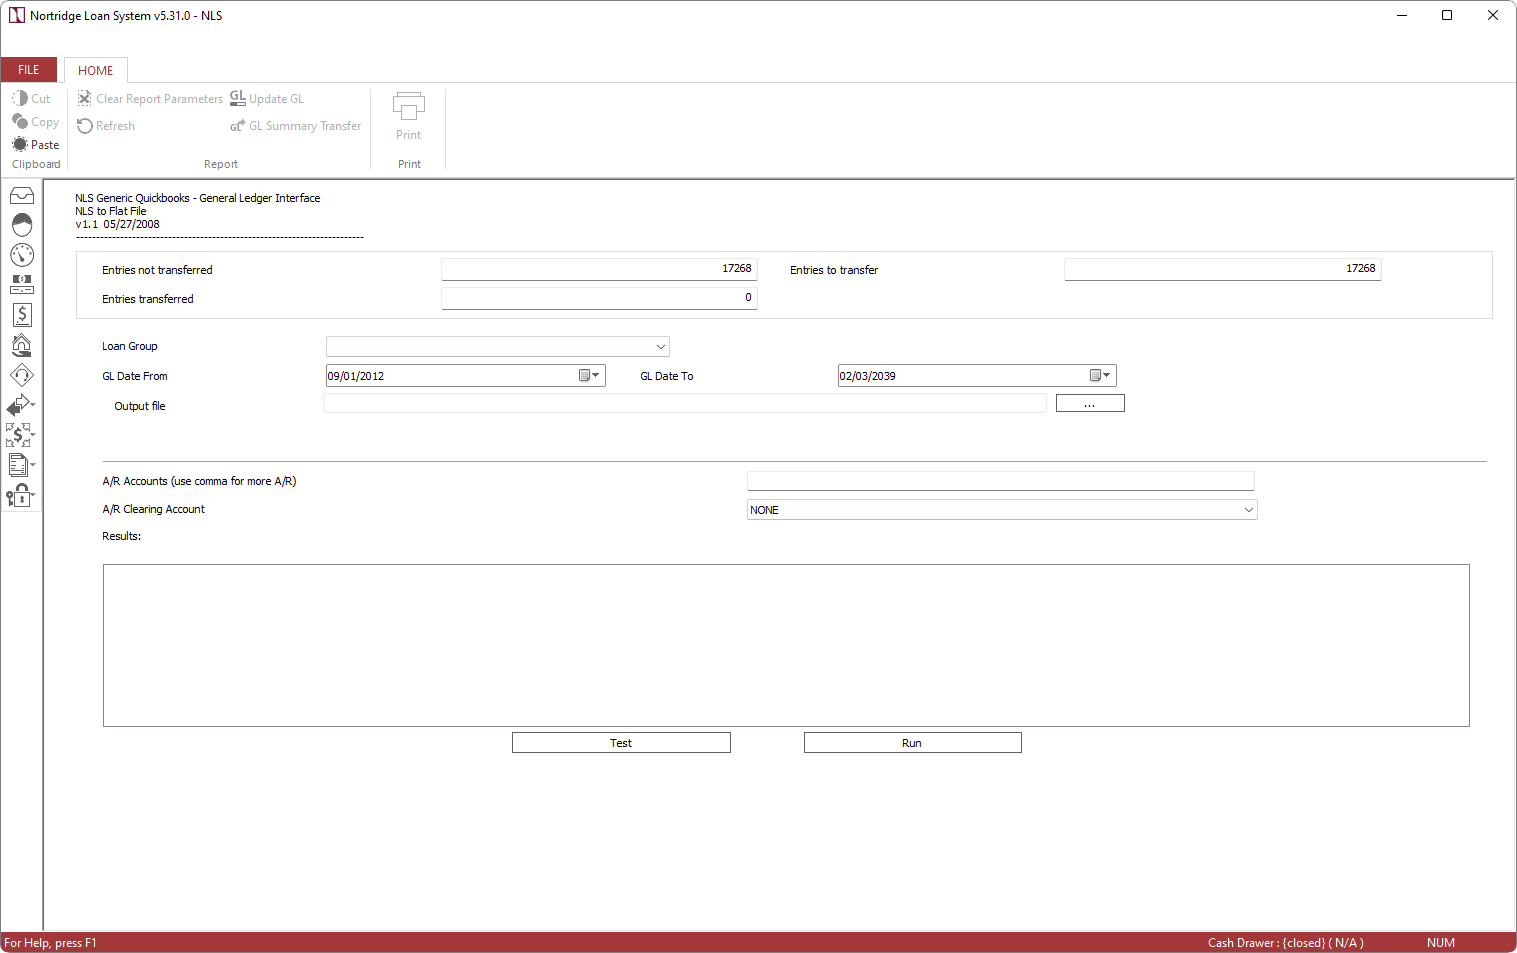
Figure – quickbooks.dll
 Document Printing
The document printing section consolidates all documents to be printed within NLS. It allows for printing documents directly to a printer or to send to an external print shop. It can be accessed from the Processing slider in the shortcut bar.
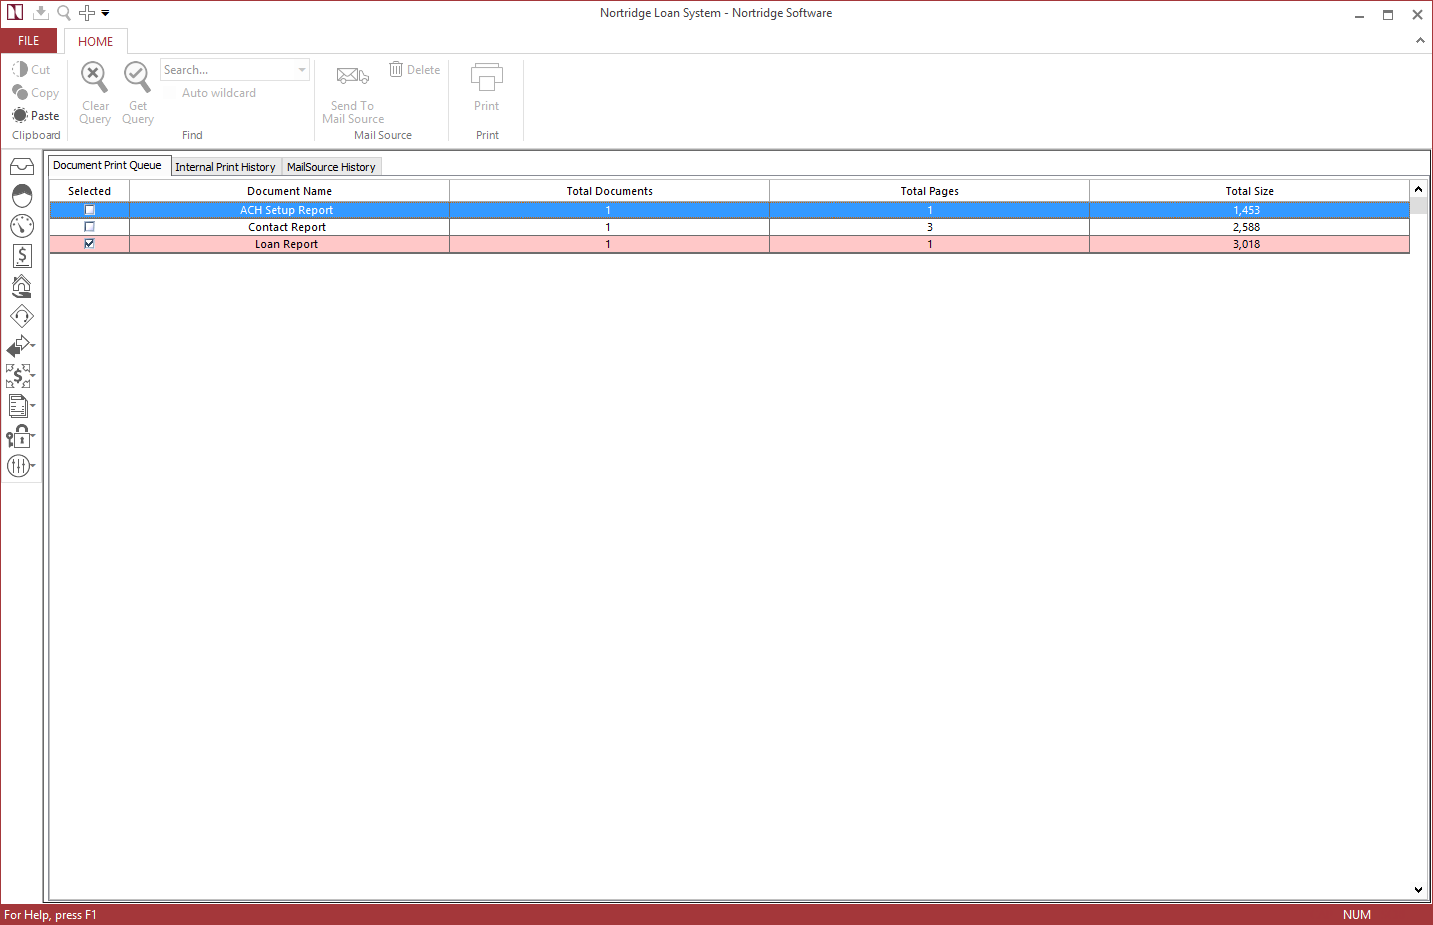
All documents that have been saved to the document queue will be shown under the Document Print Queue tab. Select the document(s) to be printed and click Print Locally on the toolbar to print on a local printer or click Send to Mail Source to send to Mail Source for processing.
Right click on the header row of the table to choose which columns to display, the sorting order, and the grouping of data.
To filter the list of document batches, right click anywhere in the table, below the header, and select Filter By….
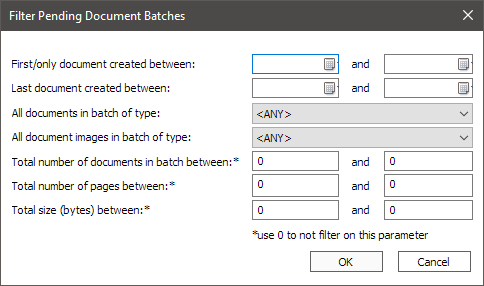
| First/only document created between | The date range in which the first document or the only document in the batch was created. The date on the left must be prior to the one on the right. |
| Last document created between | The date range in which the last document in the batch was created. The date on the left must be prior to the one on the right. |
| All documents in batch of type | The type of document; document template, statement, or late notice. |
| All document images in batch of type | The file type of the document; PDF, Word, or other. |
| Total number of documents in batch between | The total number of documents in a batch. The value on the left must be smaller than the value on the right. |
| Total number of pages between | The total number of pages across all documents in a batch. The value on the left must be smaller than the value on the right. |
| Total size (bytes) between | The total size of the batch. The value on the left must be smaller than the value on the right. |
Once the filter is applied, only those document batches that meet the criteria will be shown. To clear the current filter, right click and select Clear Filter.
Documents that have been printed locally will be shown in the Internal Print History tab and those that have been sent to MailSource will be shown in the MailSource History tab.
 DPV Validation
See the section on Delivery Point Validation for details.
 NCOA
NCOA
See the section on National Change of Address (NCOA) for details.
