Loan Defaults
The loan Defaults category contains default settings relating directly to the loans.
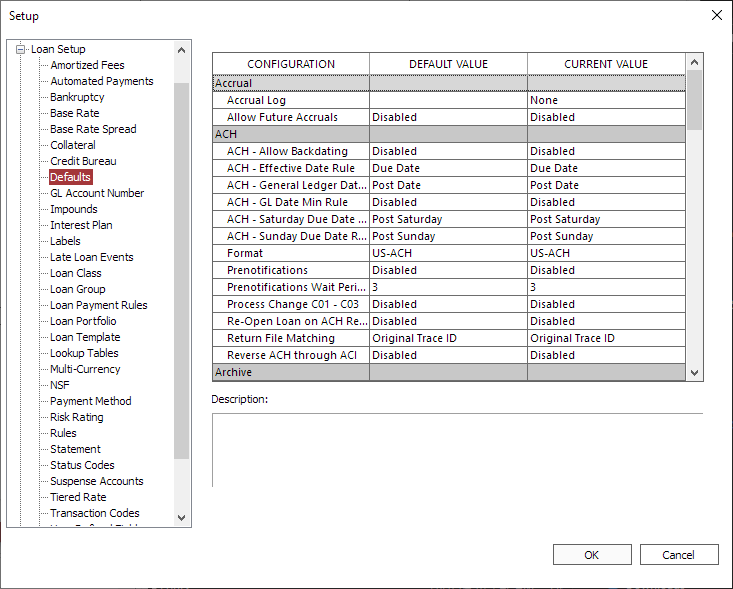
Accrual
| Accrual Log | This is the location/filename that will be generated by NLS during accrual to help debug the accrual problem. Only set the filename if you are experiencing an accrual problem. Once this value is set, the Accrual Thread value will be forced to 1. |
| Allow Future Accruals | Allows the portfolio to be accrued through the weekend or weekend and holidays. Warning Nortridge discourages the use of this feature for it closes the day to all transactions. Before enabling, please contact Nortridge Customer Support for additional information. |
ACH
| Allows the user to specify an ACH start date prior to the current date. Disabled by default, the ACH start date must be on or after the current date. If enabled, the ACH start date can be set to any date after the loan’s origination date. | |
| ACH – Effective Date Rule | This option will allow the user to specify the effective date of an ACH payment based on the due date, post date, or the lesser of the two. |
| ACH – General Ledger Date Rule | This option will allow the user to specify the general ledger date of an ACH payment based on the due date, post date, or the lesser of the two. |
| ACH – GL Date Min Rule | This option allows the ACH GL date to have a minimum date. |
| This option will modify ACH due dates that fall on a holiday to the first business day before or after the holiday; or allow the due date to fall on the holiday itself. The ACH – Saturday/Sunday Due Date Rule settings take precedence. |
|
|
ACH – Holiday Schedule5.34+
|
This option determines which holidays should be considered by the ACH - Holiday Due Date Rule setting. Multiple selections can be made. |
| ACH – Saturday Due Date Rule | This option will modify the effective dates of pending transactions in NLS that fall on a Saturday to Friday, Saturday, Sunday, or Monday. |
| ACH – Sunday Due Date Rule | This option will modify the effective dates of pending transactions in NLS that fall on a Sunday to Friday, Saturday, Sunday, or Monday. |
| Enables support for either the ACH (NACHA format) automated payment system used in the United States or the AFT (CPA Standard 005 format) automated payment system used in Canada, or both. | |
| The maximum number of days an ACH/Card One-Time Payment can be scheduled into the future. Has range of 1 - 365 days; 0 represents no limit. | |
| When enabled, NACHA position 77-78 will be populated regardless of the SEC code when Discretionary Data field is blank. When disabled, NACHA position 77-78 will only be populated when SEC code is WEB and Discretionary Data field is blank. |
|
| This option determines what types of ACH will have prenotifications applied to them. Only applies when the Prenotifications setting is enabled. Note: The ACH file will indicate "Prenotification enabled" but only relevant records will have prenotification applied to them. |
|
| When enabled, an ACH prenotification occurs on the first ACH sent. A non monetary ACH is sent to validate the routing number and account number of the receiving bank or credit union. | |
|
Prenotifications Wait Period in Days5.6+
|
The number of days NLS is to wait for a prenotification response. Default is 3 days and can be set up to 14 days. |
| When enabled, change records C01, C02, and C03 in a ACH return file will be processed and noted in the modification history. C01 - Incorrect account number. C02 - Incorrect transit/routing number. C03 - Incorrect account number and transit/routing number. |
|
| When enabled, a closed loan’s status will be set to active when a ACH reversal is processed. Any rules normally set to close the loan are suspended until the loan can be accrued to the current date. | |
| Return File Matching | This option allows for control over how the NACHA return file is matched to the original ACH entry. Original Trace ID will match with the originating trace ID whereas Loan Number, Date, Amount will match with the specific returned details. |
Archive
NLS 5.25 and later
| Archiving | When enabled, NLS can remotely archive some entries in large tables to a dedicated database for long-term storage and/or to free up storage space on the primary database. |
| Auto Archive | Enables or disables the use of the NLS Archive Service which will automatically archive any loan that has been closed for more than the number of months as specified in Auto Archive Closed Loan After X Months. |
| Auto Archive Closed Loan After X Months | The number of months after the loan has been closed before it will be automatically archived by the NLS Archive Service. |
| Target Database Name | The name of the database to use to store archived tables. The target database must have the same credentials as the source database. For the initial setup, the target database must be an empty database and NLS Service must be used to initialize the database for archiving. |
| Target Database Server | The database server where the target database for archiving is located. The source and target databases cannot be on the same server. |
Bankruptcy
NLS 5.19 and later
| Determines the behavior when NLS receives a notification that a bankruptcy has been discharged. When enabled, NLS will automatically discharge the bankruptcy. When disabled, the user must manually go to the bankruptcy record and click the Discharge command in the ribbon bar. | |||
| When enabled, NLS will automatically dismiss the bankruptcy when a notification of a bankruptcy dismissal is received. When disabled, bankruptcy status is set to “dismissed pending” which will require a user to manually dismiss the bankruptcy. | |||
| When enabled, bankruptcy features will be available. When disabled, bankruptcy features—Add Bankruptcy menu item, bankruptcy status codes, and Bankruptcy loan setup section—will be hidden. |
|||
Determines whether to apply a bankruptcy state to a loan, received in a bankruptcy filing notification, based on its origination date.
|
|||
| On Bankruptcy Discharge | This option allows the user to define the action to be taken when the Discharge Button is clicked. Select WriteOff & Close to write off and close the loan when the bankruptcy is discharged. Note Status of bankruptcy will change to DISCHARGE even if the selection is Do Nothing |
||
| On Bankruptcy Dismiss | This option allows the user to define the action to be taken when the Dismiss Button is clicked. Select Perform Clawback to perform a clawback on the loan when the bankruptcy is dismissed. Note Status of bankruptcy will change to DISMISS even if the selection is Do Nothing |
Bulk Payments
NLS 5.16 and later
Card
NLS 5.20 and later
Commitment
Credit Bureau Reporting
NLS 5.18.6 / 5.19.2 / 5.20 and later
| When enabled, the Days Past Due field in the Loan View will display Days Past Due per the CARES Act; subtracting the Days Deferred since the loan became past due. When disabled, the field will show the total Days Past Due; without subtracting the Days Deferred since the loan was past due. In either case, when the loan is past due and has been deferred since being past due, a “*” will appear in the field and the other value will be displayed in the field’s tooltip. | |||||
| Include Deferred Days in Days Past Due | When enabled, credit bureau processing will determine the Account Status by including the number of days deferred when counting how many days past due a payment is. When disabled, the Account Status is determined by the number of days past due minus the number of days deferred. |
||||
The scheduled monthly billing to report on Metro 2.
|
|||||
| This option determines the source of the original balance when reporting to the credit bureau. Only applicable if the loan being reported is a restructured loan. | |||||
| This option determines how the Term Duration on a Metro 2 is derived. When set to Original Term Due (default), the term due is the new term minus the number of months deferred. When set to Term Due, the current term due is used. |
Display
| Loan Dealer Field Display | This option allows the user to define the data format displayed in the LoanView Dealer Field. |
| Loan Maximum Fetch Count | This option will limit the number of loan records that can be retrieved from a query. The value of 0 denotes unlimited fetch count. |
| LoanView Interest Balance Option | This option allows the user to choose truncation or rounding of the interest balances on the LoanView screen. This option does not affect the data, only the display of the data. |
| ParticipantView Interest Balance Option | This option allows the user to choose truncation or rounding of the interest balances on the ParticipantView screen. This option does not affect the data, only the display of the data. |
| Set Loan Balance Precision to 5 Places | This option allows the user to choose either 2 decimal places or 5 decimal places for the LoanView and ParticipantView balance fields. This option does not affect the data, only the display of the data. |
Loan Group Transfers
| When set to No, NLS will not do any securitization during Loan Group Batch Transfers, including creating GL transfer entries. | |
| Batch: Remove Loan from Status Code List | Set this option to yes to prevent the loan from appearing in the status code list after it is successfully transferred to a new loan group. |
| Batch: Require From Loan Group to be the Same | Set this option to yes to only allow loans belonging to the same loan group to be transferred. |
|
Create and use a Clearing Group.5.13.5 - 5.32
|
When set to Yes, a clearing account placeholder is created. |
| Create GL Transfer Entries |
Set this option to Yes to record the transfer into the Transfer GL placeholders.5.33+
When set to Yes, GL entries of the transfer will be made to the designated GL Transfer accounts.5.13.5 - 5.32
Set this option to Yes to record the transfer into the Transfer GL placeholders.5.13.4-
|
| GL Auto Cutoff Date | By setting this value, NLS will allow the user to specify an automatic method for controlling the GL Minimum Date. This value is superseded by the use of the GL Minimum Date.
|
|||
| GL Interface Object Name |
This parameter is the custom general ledger interface DLL file name. When a valid DLL name (e.g. GLInterface.dll, quickbooks.dll) is specified, the system will load this custom interface into the processing section of NLS (a new GL Interface option will appear under Processing). For more information on this functionality please contact Nortridge Software.
The path to the GL Interface object may be defined as a system environment variable. Open Control Panel > System > Advanced system settings and click Environment Variables…. Create a new variable under user variables with the variable name “nortridge” and the path to the DLL as the variable value.5.9+ |
|||
| GL Maximum Cutoff Date | By setting this value, NLS will not allow the general ledger date to be set after this date. This effectively allows the user to force all general ledger entries to be posted in a specific accounting period. | |||
| GL Minimum Cutoff Date | By setting this value, NLS will not allow the general ledger date to be set prior to this date. This effectively allows the user to close accounting periods. | |||
| When enabled, existing GL amounts in the daily trial balance is updated when interest rates are adjusted. When disabled, existing GL amounts in the daily trial balance will not be updated when interest rates are adjusted. |
||||
| When enabled, NLS will automatically generate Transaction Code 10 Trust Deposit when payments are entered and Transaction Code 20 Trust Disbursement when the disbursement is made. |
Miscellaneous
| When enabled, the Search by Branch field in the Advanced Global Search dialog will be active. | |
| When enabled, Participant Rules for Amortized Fees are available to break down the fees per participant. | |
|
This option determines which branch a transaction reversal affects. When enabled (default), the reversal is posted from the branch that the original transaction was posted in. When disabled, the reversal is posted from the current user’s branch. To display a dialog for selecting a branch location during transaction entry, make sure this option is enabled and the security for the user’s Cash Drawer > Cash drawer not required for payment reversals is granted. When set to By Security, the user’s privilege set in Cash Drawer > Branch Option During Reversals will determine the behavior for that user. If the user has the Branch Option During Reversal privilege, then the reversal is posted from the branch that the original transaction was posted in. Without the Branch Option During Reversal privilege, the reversal is posted from the current user’s branch.5.28+ |
|
| Determines the behavior of NLS when a user attempts to add or modify a commitment loan in such a way that either the due date or the billing cutoff is different from the due dates and billing cutoffs of its neighboring commitment loans. When this happens, the statement generation for the parent loan can become desynchronized and require multiple statements across the commitment loans. Enforce Synchronization will allow the user to make the change, but will also copy the change to all other related commitments. Warn User will allow the change, but will pop up a warning message explaining the issue. | |
| When enabled, the number of Days Past Due for loans using End of Day accrual will be calculated based on the system date (the day after the current accrued-through date). When disabled (default), the number of Days Past Due will be calculated based on the accrued-through date (the same way it is calculated for loans using Beginning of Day accrual).
Warning Changing this setting will affect all calculations that reference Days Past Due (late fees, loan statistics, credit bureau, etc.). Disabled is the default behavior of NLS. This setting cannot be disabled once it has been enabled. |
|
| Interest Rate Decimal Places | This default defines how many decimal places are used in NLS when working with interest rates. The available options are for five or eight decimal places of precision on the annualized interest rate. |
| When enabled, a prompt will appear when changing a loan’s portfolio asking for an effective date. Valid date range is between the loan’s origination date and the interest accrued through date. The current date is the default if it is within the valid range. | |
| Recalc Balloon Payment | Calculation of the balloon payment is an expensive process during the accrual run. The options are: Continuous - This will re-calculate the balloon payment after every transaction Last 3, 6, or 12 Months of Loan - This will re-calculate the balloon payment only during the last months of the loan and will greatly enhance performance. |
| When enabled, the initial state of a loan’s Transactions tab is set to show reversed transactions. When disabled, the initial state of a loan’s Transactions tab is set to hide reversed transactions. |
|
| This option determines the effective date of writing off the sub-penny residual amount in NLS. If Payoff Date is selected, the sub-penny residual amount will be written off on the day the loan is paid off. If Close Date is selected, the sub-penny residual amount will be written off on the day the loan is closed. Note Backdating a payoff or a loan with First Day Accrual & Beginning of Day Accrual selected will always clear the sub-penny amount during payoff. |
|
| Transaction Entry Batches | This option allows the control of batches in Transaction Processing. There are three options: Disabled, Prompt for Batch, and Force Batch. If disabled, batches can not be used. Prompt for Batch will prompt the user to set up a batch before starting transaction entry but a batch is not required. The Force Batch option forces the user to use batches when entering transactions. |
| Voucher Check Printing Option | This option will determine the options available to the user when processing vouchers. Print Check will allow the user to create a check whereas Print Report will only generate a report. Both options will mark the voucher as processed. |
Multi Threading
| For MS SQL only. Not applicable to Oracle. When enabled and:5.35.8+ Accrual Multi-Processing is disabled - multiple threads, as defined by Accrual Process Max Thread Count, will spawn. Example Accrual Hyperthreading = EnabledAccrual Multi-Processing = Disabled Accrual Multi-Processing Max Instance Count = 64 Accrual Process Max Thread = 2 Result: 2 servers will participate in the accrual, each server launching a single instance of NLSAccruals.exe. Accrual Multi-Processing is enabled - Accrual Process Max Thread Count specifies the number of servers that will launch the number of instances of NLSAccruals.exe as specified by Accrual Multi-Processing Max Instance Count. Example Accrual Hyperthreading = EnabledAccrual Multi-Processing = Enabled Accrual Multi-Processing Max Instance Count = 64 Accrual Process Max Thread = 2 Result: 2 servers will participate in the accrual, each server will launch 64 instances of NLSAccruals.exe for a total of 128. When disabled: Example Accrual Hyperthreading = DisabledAccrual Multi-Processing = Enabled Accrual Multi-Processing Max Instance Count = 64 Accrual Process Max Thread = 2 Result: Only 1 server will participate in the accrual with 64 instances of NLSAccruals.exe. When enabled, multiple servers—as set in Accrual Hyperthreading # of Servers—will be used during the accrual process.5.19 – 5.35.7 |
|
| The amount of time (in seconds) that each process, when Accrual Hyperthreading is enabled, must wait for the AccrualPool to be populated before it can start processing the accrual. Only 1 of the many processes is responsible for populating the AccrualPool table. The rest of the process must wait before reading the AccrualPool table. | |
|
Accrual Hyperthreading # of Servers5.19 - 5.35.7
|
The maximum number of servers that may be utilized by Accrual Hyperthreading. |
| Rather than spawn individual accrual threads from the same NLSAccruals.exe instance, all of which would share the same memory and CPU resources, this setting will spawn entire NLSAccruals.exe instances, each with their own memory and CPU resources. Depending on the server, the number of instances, and the number of threads spawned by each instance, this can have dramatically different performance characteristics than hyper-threading, or multi-threading alone. Each instance will have a number of threads determined by the Accrual Process Max Thread Count setting. Note This setting overrides the Accrual Hyperthreading settings. |
|
|
Accrual Multi-Processing Max Instance Count5.32+
|
The number of NLSAccruals.exe instances spawned on each participating server when Accrual Multi-Processing is enabled.5.35.8+
Determines the total number of NLSAccruals.exe instances spawned when Accrual Multi-Processing is enabled. This setting does not affect the number of threads each instance spawns.5.32 – 5.35.7
Note More instances does not necessarily equate to better performance. |
| Accrual Process Max Thread Count | During accrual processing, NLS will spawn additional processing threads which will greatly increase the throughput of accruals. The server that this is executed on will determine the number of effective threads that can be used. Determines the number of servers that will participate when Accrual Multi-Processing is enabled.5.35.8+ The allowable number of instances is 2 to 64. Note More threads do not necessarily equate to better performance. |
| Credit Bureau Max Thread Count | During processing of the credit bureau reporting, NLS will spawn additional processing threads which will greatly increase the speed of creating the Metro 2 file. The server that this is executed on will determine the number of effective threads that can be used. Note of caution, more threads does not necessarily equate to better performance. |
| During credit card processing, NLS will spawn additional processing threads which will greatly increase the throughput of credit card processing. Depending on the server that this is executed on will determine the number of effective threads that can be used. Note of caution, more threads does not necessarily equate to better performance. The maximum number of threads for this process is 4. | |
| Statement Process Max Thread Count | During statement processing, NLS will spawn additional processing threads which will greatly increase the throughput of statements. Depending on the server that this is executed on will determine the number of effective threads that can be used. Note of caution, more threads does not necessarily equate to better performance. |
Oracle Specific
| Oracle Accruals Bulk Insert Buffer | Size of buffer for bulk mode operation. When using this parameter bigger is not always better. Start with an initial value of 500 or 1,000 and work up from there. Valid range is 1 - 10,000. This parameter is ignored by databases other than Oracle. |
| Oracle Accruals Bulk Insert Mode | Enable bulk insert mode operation during accrual processing. Turning this parameter on can greatly increase the speed of accruals on large systems. This parameter is ignored by databases other than Oracle. |
NLS 5.18 and later
| This option is only applicable for loans that uses pre-compute interest. When enabled, each principal advance will trigger a pre-compute transaction (Transaction code 110). The pre-compute transaction is reversed when the principal advance is reversed. When disabled, the pre-compute interest is only established on the 1st principal advance. The pre-compute interest is not reversed when the principal advance is reversed. |
|
| Include Pre-Compute Interest in Metro 2 | When set to Yes, the pre-compute interest is included in the original balance and current balance on the Metro 2 only on loans that use pre-compute interest. |
| This is the default prepayment charge for the Louisiana Prepayment Charge rebate rule. |
Tree Control
| Contact – Loan Relationship Tree Element 1 – Couple | Element #1 of the Loan View Relationship Tree Control. By setting this value you can control the displayed contents of the Contact-Loan Relationship Tree Control for the Couple type records. |
| Contact – Loan Relationship Tree Element 1 – Ind. | Element #1 of the Loan View Relationship Tree Control. By setting this value you can control the displayed contents of the Contact-Loan Relationship Tree Control for the Individual type records. |
| Contact – Loan Relationship Tree Element 1 – Org. | Element #1 of the Loan View Relationship Tree Control. By setting this value you can control the displayed contents of the Contact-Loan Relationship Tree Control for the Organization type records. |
| Contact – Loan Relationship Tree Element 2 – Couple | Element #2 of the Loan View Relationship Tree Control. By setting this value you can control the displayed contents of the Contact-Loan Relationship Tree Control for the Couple type records. |
| Contact – Loan Relationship Tree Element 2 – Ind. | Element #2 of the Loan View Relationship Tree Control. By setting this value you can control the displayed contents of the Contact-Loan Relationship Tree Control for the Individual type records. |
| Contact – Loan Relationship Tree Element 2 – Org. | Element #2 of the Loan View Relationship Tree Control. By setting this value you can control the displayed contents of the Contact-Loan Relationship Tree Control for the Organization type records. |
| Contact – Loan Relationship Tree Element 3 – Couple | Element #3 of the Loan View Relationship Tree Control. By setting this value you can control the displayed contents of the Contact-Loan Relationship Tree Control for the Couple type records. |
| Contact – Loan Relationship Tree Element 3 – Ind. | Element #3 of the Loan View Relationship Tree Control. By setting this value you can control the displayed contents of the Contact-Loan Relationship Tree Control for the Individual type records. |
| Contact – Loan Relationship . Tree Element 3 – Org. | Element #3 of the Loan View Relationship Tree Control. By setting this value you can control the displayed contents of the Contact-Loan Relationship Tree Control for the Organization type records. |
| Loan Tree Control Element 1 | Element #1 of the Loan View Tree Control. By setting this value you can control the displayed contents of the Loan Tree Control. |
| Loan Tree Control Element 2 | Element #2 of the Loan View Tree Control. By setting this value you can control the displayed contents of the Loan Tree Control. |
| Loan Tree Control Element 3 | Element #3 of the Loan View Tree Control. By setting this value you can control the displayed contents of the Loan Tree Control. |
