Entering a Conversion Loan
The process of entering a conversion loan cannot be easily defined in general terms. There are simply too many variations of the kinds of loans that may be entered in the Nortridge Loan System.
Rather than attempt to give information on the general practice of entering conversion loans, information that would not be functionally useful when applied to specific cases, we will provide examples of entering conversion loans of several common loan types. Each of these examples will be shown with the assumption that Loan Templates are NOT used. This way we will be showing all of the loan input parameters and avoiding the confusion that could be introduced by having incomplete information.
These examples must not be assumed to be complete and comprehensive. There are many more types of loan configurations supported by the Nortridge Loan System than could be detailed in any book or help system. If the specific examples do not easily adapt to the types of loans that you book, your Nortridge Software Sales Representative will work with your Nortridge Software Technical Support Consultant to determine the best configuration of parameters to fit your loans.
Each example will be identical to the corresponding example of entering a new loan, but with the assumption that we are converting the loan at some point after it has already been booked and begun to accrue interest (and possibly payments).
This example is a complete walk through of all of the steps required to convert a simple, fixed amortized, mortgage loan. The example uses specific amounts and dates, and so care must be taken to make the appropriate adjustments if using the example to aid in converting a real mortgage loan.
Assume the following situation:
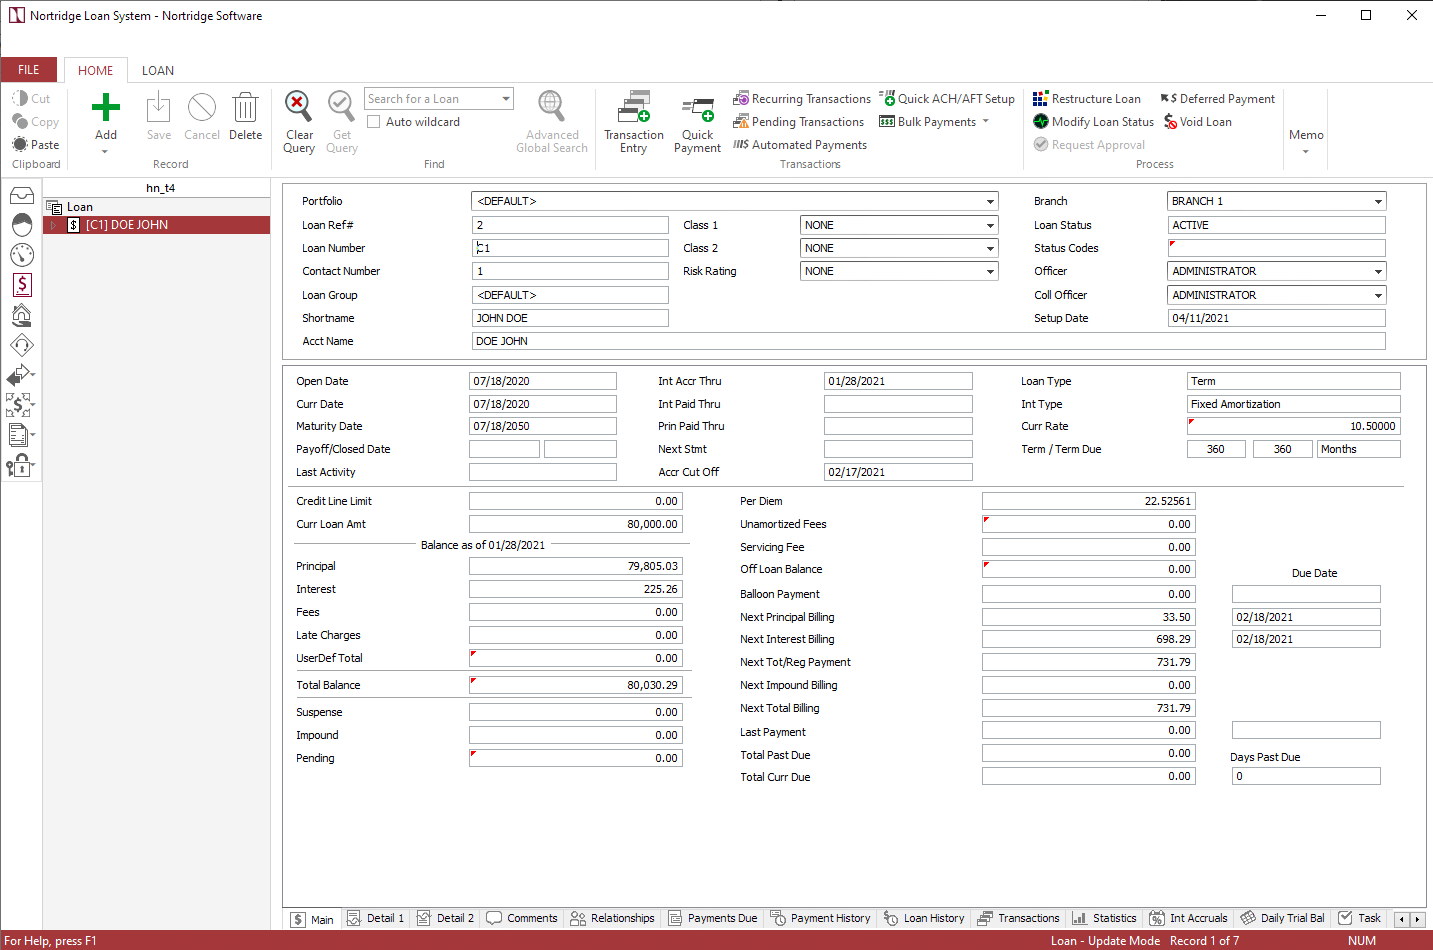
On July 18, 2020, a loan was entered onto an old Loan System. That loan was an $80,000 amortized mortgage with an interest rate fixed at 10.5% for 30 years. On January 28, 2021, the lending institution began to convert all of its loans to the Nortridge Loan System.
As of January 28, 2021, the loan had been accrued through January 27, 2021, and the interest balance (accrued since the last payment date) was $225.26. After several payments had been paid the principal balance remaining was $79,805.03 and the next payment date was February 18, 2021.
Begin by querying your list of contacts for the borrower and click to highlight the contact in the contact list. Click  under
under  on the ribbon bar and select Add New Loan from the drop down menu. A new loan will be added to the currently selected contact.
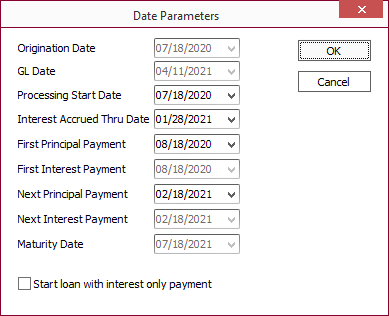
In the Add New Loan window that opens, select Conversion from the Add Loan As drop down list then enter a loan number in the Loan Number field. Other parameters, such as account name and TIN, will be filled in automatically from the current contact’s existing information.
Main Tab
Leave Loan Type set to Term.
Enter 80,000 in the Net Loan Amount field.
Select Fixed Amortization from the Interest Method drop down list.
Enter 10.5 in the Interest Rate field.
Set Payment Period to Monthly.
Enter 07/18/2020 in the Origination Date field.
Click  next to Origination Date to open a pop-up window with more date parameters for this loan.
Date Parameters
Set Processing Start Date to 07/18/2020.
Set Interest Accrued Thru Date to 01/28/2021.
Leave First Principal Payment to 08/18/2020.
Set Next Principal Payment to 02/18/2021.
Once those changes have been made, the Date Parameters window should look like the example shown below.
Click OK.
Leave Term Type set to Months.
Set Term and Term Due both to 360.
The Main tab should now look like the example shown below.
Classification Tab
Select the proper Loan Group, Loan Classes, and Officers for your loan. Your lending institution should have procedures in place to determine which are used for this loan. Their settings are not relevant to the discussion of setting up different types of loans, other than to note that they should be entered at this point in the process.
Statements Tab
Select the billing cutoff. This will determine the day on which a payment is billed.
Example
If the billing cutoff is –10, and the next payment is due on August 18, then that payment will bill on August 8.Select the statement code (or codes) and the late fee code that your company procedures have determined shall be used for this type of loan.
Re-Payment Tab
Generally the default payment distribution should be left as your system administrator has defined it, so you should not need to make any modifications on this tab.
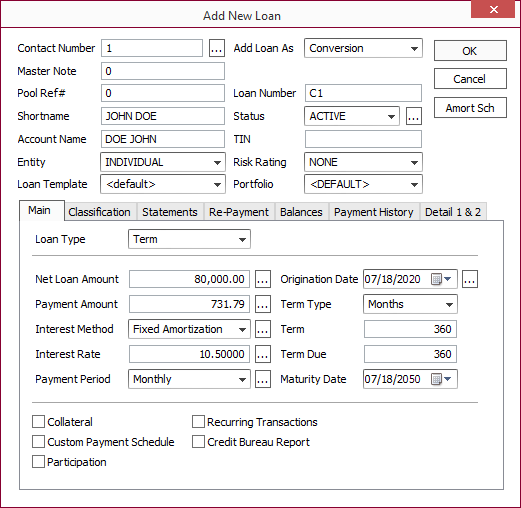
Balances Tab
Enter 79,805.03 for Curr Princ Amount.
Enter 225.26 for Curr Interest Amount. This amount must correspond with the Interest Accrued Thru Date that was entered previously. The interest balance was 225.26 as of 1/28/2021.
Enter 80,000 for Total Princ Advanced.
Enter 0 for YTD Principal Advanced.
Enter 33.21 for YTD Princ Paid.
Enter 4,195.77 for Total Interest Paid.
Enter 698.58 for YTD Interest Paid.
Enter 6 for each of # of Payments Principal / Interest / Total Paid.
Detail 1 & 2
The Detail tabs contain the user-defined fields for the loan account. No user-defined fields are required for this example.
Click OK to save the loan.
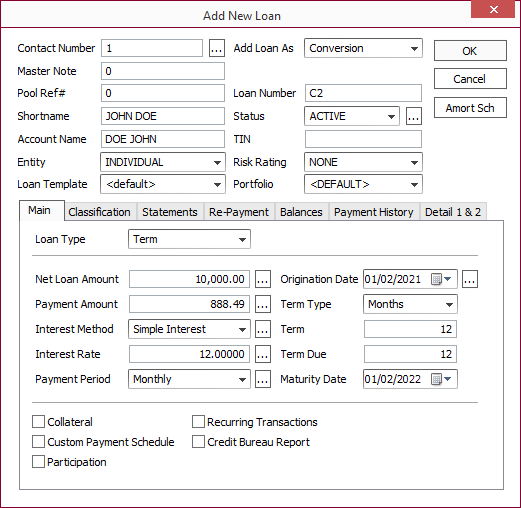
This example is a complete walk through of all of the steps required to convert a consumer installment loan. The example uses specific amounts and dates, and so care must be taken to make the appropriate adjustments if using the example to aid in converting a real consumer installment loan.
Assume the following situation:
On January 2, 2021, a loan was entered onto an old loan system. That loan was $10,000 for 12 months at a simple interest rate of 12% a year, to be repaid in 12 equal monthly installments. On February 3, 2021, the lending institution began to convert all of its loans to the Nortridge Loan System.
As of February 3, 2021, the loan had been accrued through February 2, 2021, and the interest balance was $6.05 after the first payment had been entered on February 1, 2021. The principal balance was $9,210.14, and the next payment date was March 2, 2021.
Begin by querying your list of contacts for the borrower and click to highlight the contact in the contact list. Click under on the ribbon bar and select Add New Loan from the drop down menu. A new loan will be added to the currently selected contact.
In the Add New Loan window that opens, select Conversion from the Add Loan As drop down list then enter a loan number in the Loan Number field. Other parameters, such as account name and TIN, will be filled in automatically from the current contact’s existing information.
Main Tab
Leave Loan Type set to Term.
Enter 10,000 in the Net Loan Amount field.
Leave Interest Method set to Simple Interest.
Enter 12 in the Interest Rate field.
Leave Payment Period set to Monthly.
Enter 01/02/2021 in the Origination Date field.
Click next to Origination Date to bring up a pop-up window with more date parameters for this loan.
Date Parameters
Set Processing Start Date to 01/02/2021.
Set Interest Accrued Thru Date to 02/02/2021.
Set First Principal Payment to 02/02/2021.
Set Next Principal Payment to 03/02/2021.

Click OK.
Set Term Type to Months.
Set Term and Term Due to 12.
The Main tab should now look like the example shown below.
Classification Tab
Select the proper Loan Group, Loan Classes, and Officers for your loan. Your lending institution should have procedures in place to determine which are used for this loan. Their settings are not relevant to the discussion of setting up different types of loans, other than to note that they should be entered at this point in the process.
Statements Tab
Select the billing cutoff. This will determine the day on which a payment is billed.
Example
If the billing cutoff is –10, and the next payment is due on September 2, then that payment will bill on August 23.Select the statement code (or codes) and the late fee code that your company procedures have determined shall be used for this type of loan.
Re-Payment Tab
Generally the default payment distribution should be left as your system administrator has defined it, so you should not need to make any modifications on this tab.
Balances Tab
Enter 9,210.14 for Current Princ Amount.
Enter 6.05 for Current Interest Amount (this amount must correspond with the Interest Accrued Thru Date that was entered previously—the interest balance was 6.05 as of 02/02/2021).
Enter 10,000 for Total Princ Advanced.
Enter 10,000 for YTD Princ Advanced.
Total Princ Paid should automatically update to 789.86.
Enter 789.86 for YTD Princ Paid.
Enter 98.63 for Total Interest Paid and YTD Interest Paid.
Enter 888.49 for Last Payment Amount.
Enter 02/02/2021 for Last Payment Date.
Enter 1 for each of the fields next to # of Payments Principal/Interest/Total Paid.
Note
These fields tell the system the number of payments that have been made on the loan. For a simple interest loan these entries are not critical, since payment amounts are determined based on the current balances, however certain other types of loans will not accrue properly without this information.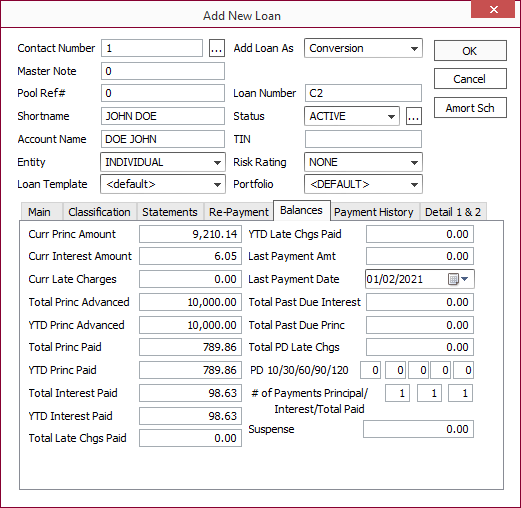
Payment History Tab
On your conversion loans, you may enter the past payment history as memo entry items.
Click Add  .
.
Enter a payment number, due date, description, and amount.
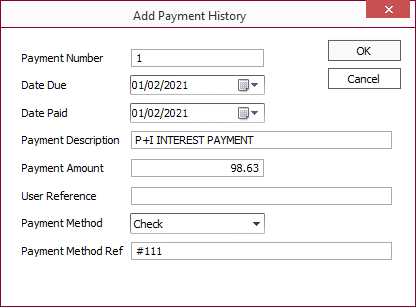
Click OK.
Repeat the process for the Principal Portion of Payment #1.
Note
The entry of Payment History on a Conversion Loan is entirely optional.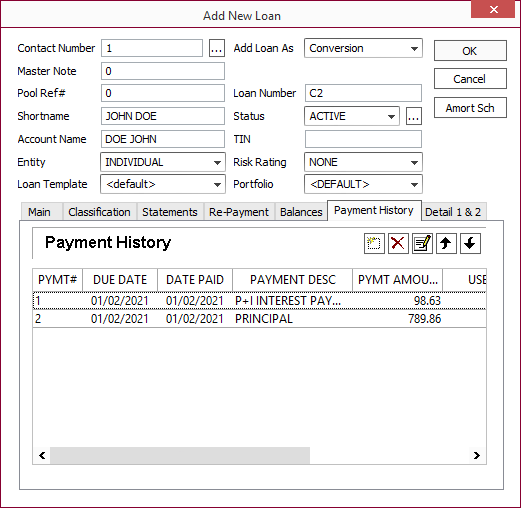
Detail 1 & 2
The Detail tabs contain the user-defined fields for the loan account. No user-defined fields are required for this example.
Click OK to save the loan.
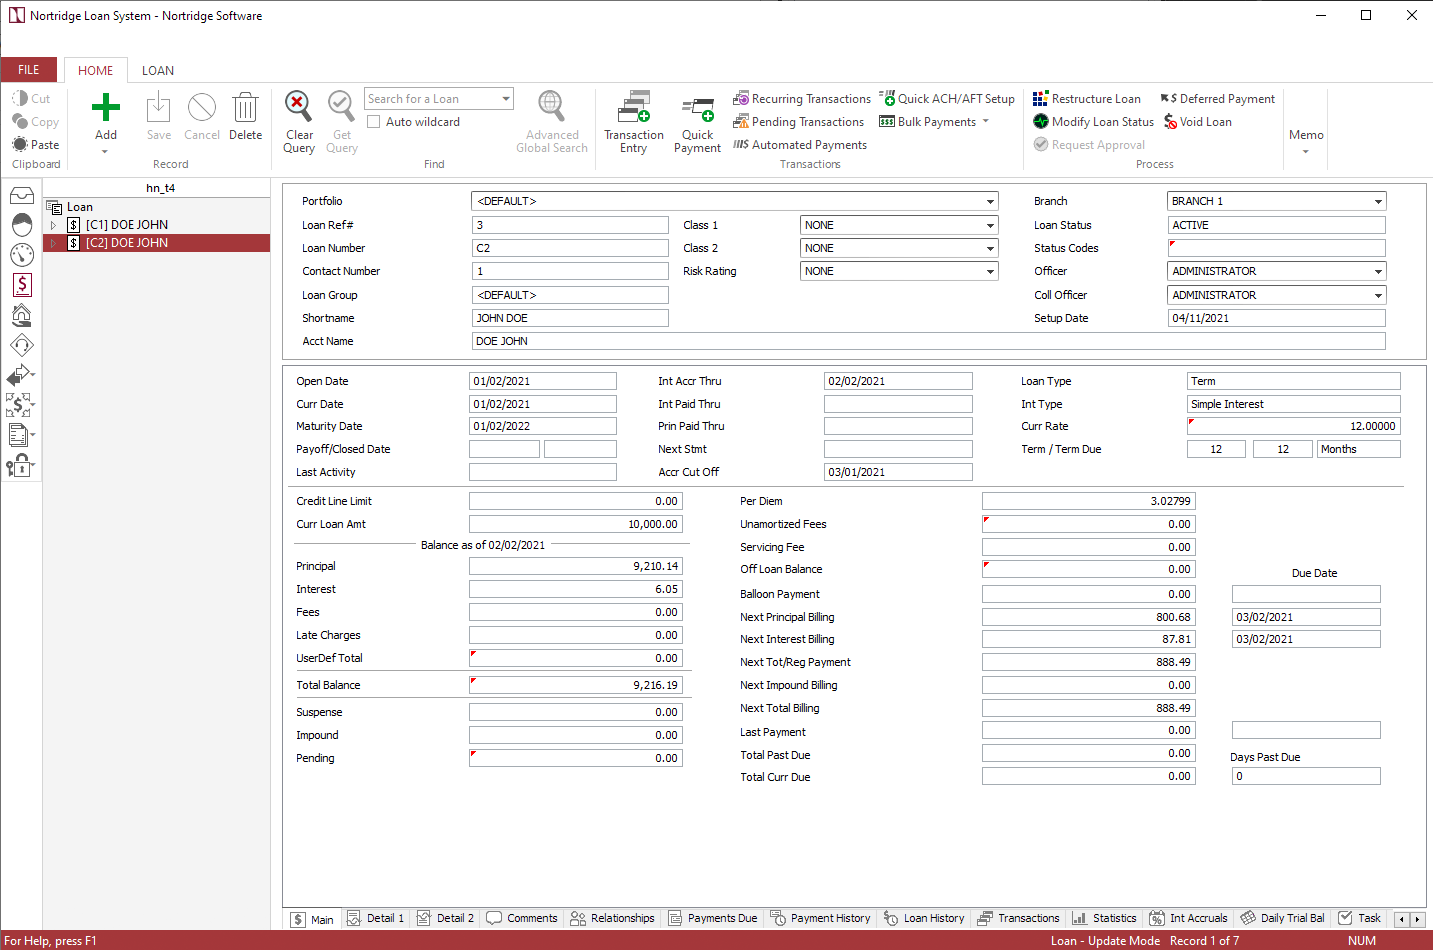
This example is a complete walk through of all of the steps required to convert an existing add on interest loan. The example uses specific amounts and dates, and so care must be taken to make appropriate adjustments if using this example to aid in converting a real loan.
Assume the following situation:
On January 1, 2021, a bank loaned $11,025 to be repaid in 12 equal monthly installments. The dollar amount of the interest is $975. Interest is added to the amount borrowed to arrive at the principal amount of the loan ($11,025 + $975 = $12,000). The quoted interest rate is 8.8435%.
On February 5, 2021, the bank was required to convert this existing loan onto the Nortridge Loan System from their old lending software. As of that day, the loan had been accrued through February 4, 2021. One of the 12 monthly payments had already been made. The principal remaining was $10,175.00, and the interest balance was $19.64.
Begin by querying your list of contacts for the borrower and click to highlight the contact in the contact list. Click under on the ribbon bar and select Add New Loan from the drop down menu. A new loan will be added to the currently selected contact.
In the Add New Loan window that opens, select Conversion from the Add Loan As drop down list then enter a loan number in the Loan Number field. Other parameters, such as account name and TIN, will be filled in automatically from the current contact’s existing information.
Main Tab
Leave Loan Type set to Term.
Enter 11,025 in the Net Loan Amount field.
Select Rule of 78s - Add On from the Interest Method drop down list.
Enter 8.8435 in the Interest Rate field.
Set Payment Period to Monthly.
Enter 01/01/2021 in the Origination Date field.
Click next to Origination Date to bring up a pop-up window with date parameters.
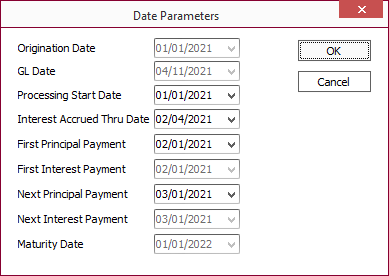
Date Parameters
Enter 02/04/2021 for Interest Accrued Thru Date.
Enter 03/01/2021 for Next Principal Payment.
Once these changes have been made, the Date Parameters pop-up window should look like the example shown below:
Click OK.
Set the Term Type to Months.
Set the Term to 12.
The Maturity Date field will be automatically updated.
The Payment Amount field has been automatically filled in based on applying the Rule of 78s to the amount of $11,025 at 8.8435%.
The Main tab should now look like the example shown below.

Classification Tab
Select the proper Loan Group, Loan Classes, and Officers for your loan. Your lending institution should have procedures in place to determine which are used for this loan. Their settings are not relevant to the discussion of setting up different types of loans, other than to note that they should be entered at this point in the process.
Statements Tab
Select the billing cutoff. This will determine the day on which a payment is billed.
Example
If the billing cutoff is –10, and the next payment is due on February 1, then that payment will bill on January 22.Select the statement code (or codes) and the late fee code that your company procedures have determined shall be used for this type of loan.
Re-payment Tab
Generally the default payment distribution should be left as your system administrator has defined it, so you should not need to make any modifications on this tab.
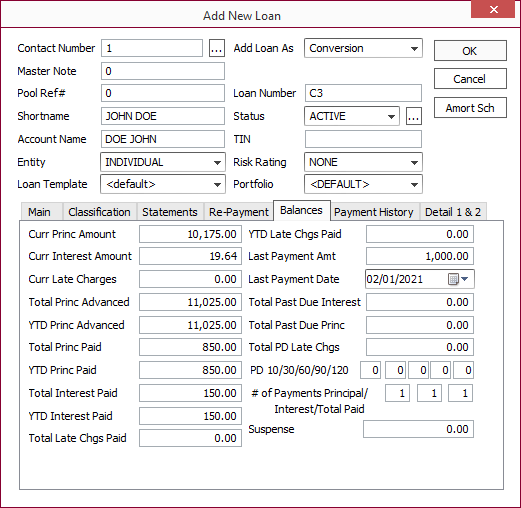
Balances Tab
Set Curr Princ Amount to 10,175.00.
Set Curr Interest Amount to 19.64.
Set Total Princ Advanced to 11,025.00.
Set YTD Princ Advanced to 11,025.00.
Set YTD Princ Paid to 850.00.
Set Total Interest Paid to 150.00.
Set YTD Interest Paid to 150.00.
Set Last Payment Amt to 1,000.00.
Set Last Payment Date to 02/01/2021.
Enter 1 in each of the three # of Payments fields.
The Balances tab should now look like the example shown below:
Payment History Tab
On your conversion loans, you may enter the past payment history (as memo entry items).
Click Add .
Enter a payment number, due date, description, and amount, as shown below:
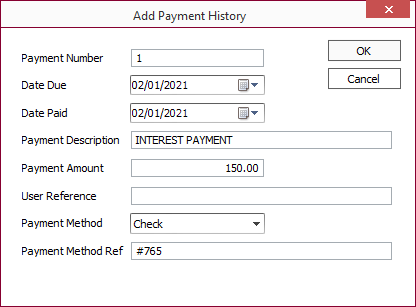
Click OK.
Repeat the process for the Principal Portion of Payment #1.
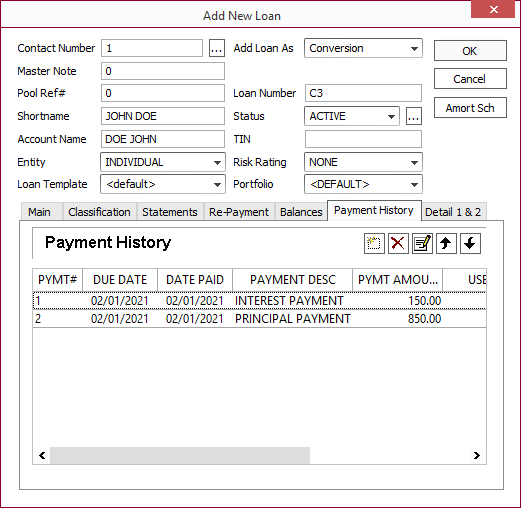
After entering the interest and principal payments, the Payment History tab should look like the example shown below:
Note
The entry of Payment History on a Conversion Loan is entirely optional.Detail 1 & 2
The Detail tabs contain the user-defined fields for the loan account. No user-defined fields are required for this example.
Click OK to save the loan.
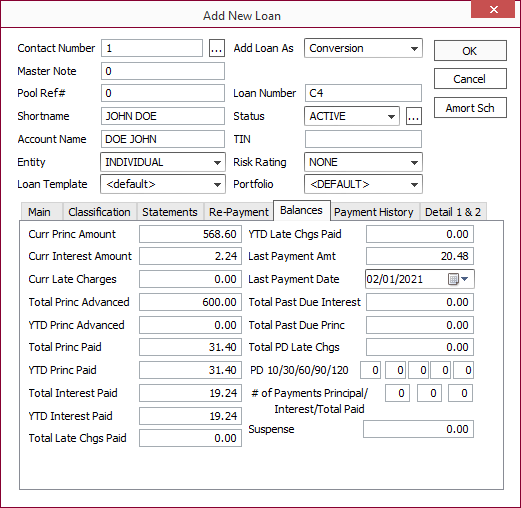
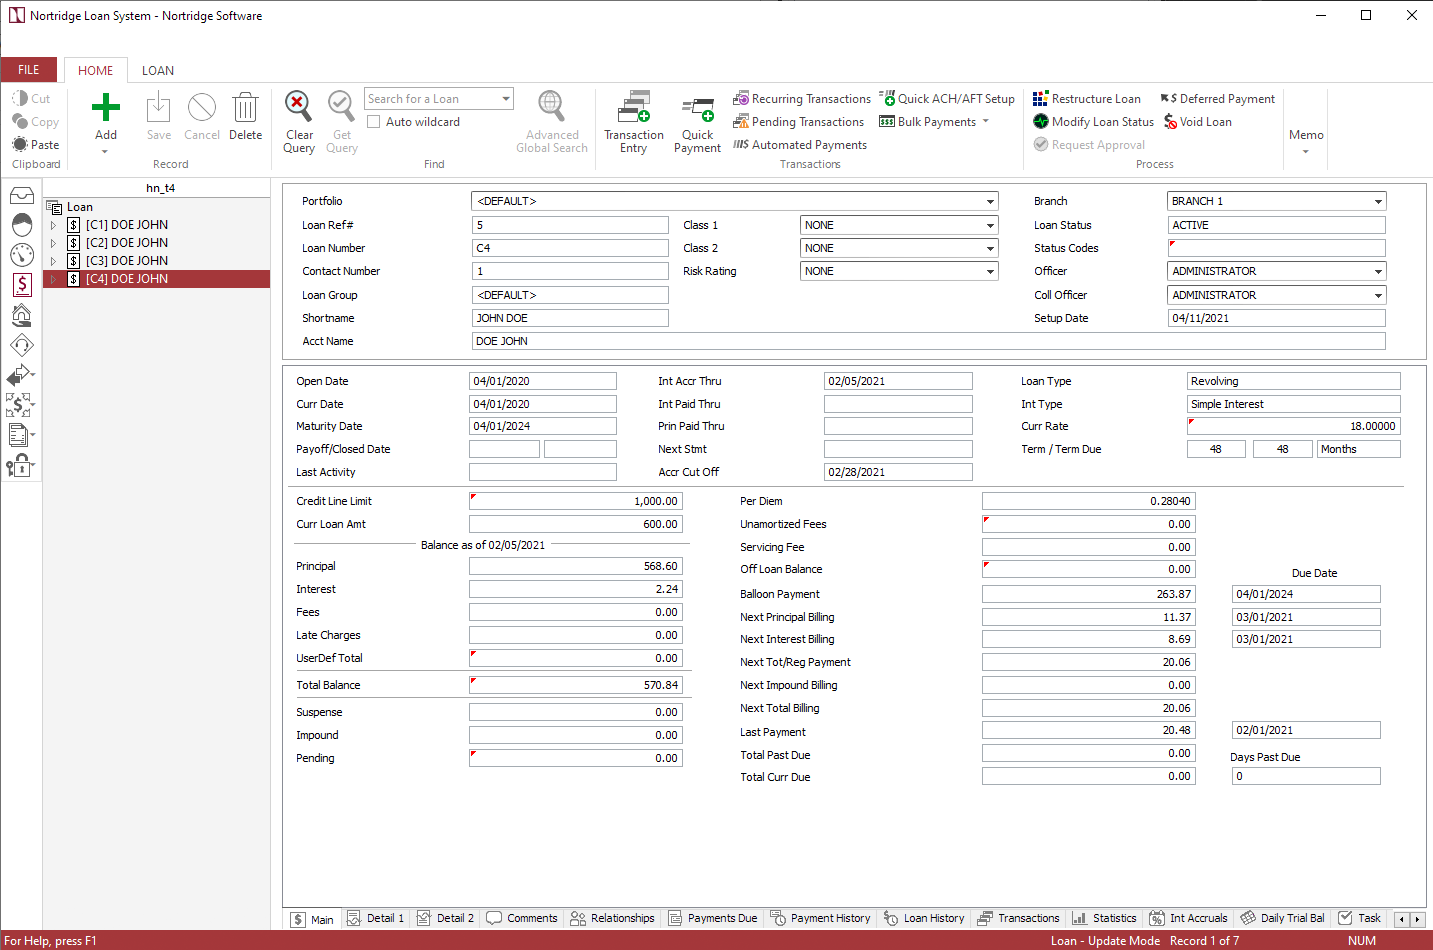
This example is a complete walk through of all of the steps required to convert an existing revolving credit line. The example uses specific amounts and dates, and so care must be taken to make the appropriate adjustments if using this example to aid in converting a real line of credit.
Assume the following situation:
On April 1, 2020, a consumer applied for and received a credit card. The credit card has a limit of $1,000.00. Payments will be due on the 1st of each month and the minimum payment will consist of any accrued interest, plus 2% of the accumulated principal. The interest rate is 18% and the credit card will expire after four years.
On February 5, 2021, the bank converted this loan to the Nortridge Loan System. As of that date, the current balances of the loan were $568.60 in principal, and $1.12 in interest (accrued since the last payment was made on February 1). The total amount borrowed on this credit card was $600.00 with total principal payments of $31.40 reducing the balance to its current figure of $568.60. The total interest accrued was $20.36, with interest payments of $19.24 reducing the interest to its current balance of $2.24. The last payment was made on February 1, in the amount of $20.48.
Begin by querying your list of contacts for the borrower and click to highlight the contact in the contact list. Click under on the ribbon bar and select Add New Loan from the drop down menu. A new loan will be added to the currently selected contact.
In the Add New Loan window that opens, select Conversion from the Add Loan As drop down list then enter a loan number in the Loan Number field. Other parameters, such as account name and TIN, will be filled in automatically from the current contact’s existing information.
Main Tab
Set Loan Type to Revolving.
Set Credit Line to 1,000.00.
Set Net Loan Amount to 600.00 (the total amount advanced).
Set Interest Method to Average Daily Balance.
Set the Interest Rate to 18%.
Click next to Payment Period to bring up a pop-up window with in-depth Payment Period information.
Payment Period
Set Amort Method to Not Applicable.
Set Interest Period to Monthly.
Set Interest Payment Method to All Interest Due at Payment Less Accrual Cutoff.
Set Principal Period to Monthly.
Set Principal Payment Method to Percentage of Principal.
Set Percentage to 2%.
Once these changes have been made, the Payment Period pop-up window should look like the example shown below.
Click OK.
Enter 04/01/2020 in the Origination Date field.
Click next to Origination Date to open the Date Parameters window.
Date Parameters
Set Interest Accrued Thru Date to 02/05/2021.
Leave First Principal Payment date and First Interest Payment date set to 05/01/2020.
Set Next Principal Payment date and Next Interest Payment date to 03/01/2021.
Once these changes have been made, the Date Parameters window should look like the example below.

Click OK.
Leave Term Type set to Months.
Set Term and Term Due both to 48.
The Maturity Date field will be updated automatically.
The Main tab should now look like the example shown below.

Classification Tab
Select the proper Loan Group, Loan Classes, and Officers for your loan. Your lending institution should have procedures in place to determine which are used for this loan. Their settings are not relevant to the discussion of setting up different types of loans, other than to note that they should be entered at this point in the process.
Statements Tab
Select the billing cutoff. This will determine the day on which a payment is billed.
Example
If the billing cutoff is –10, and the next payment is due on September 1, then that payment will bill on August 22.Select the statement code (or codes) and the late fee code that your company procedures have determined shall be used for this type of loan.
Re-Payment Tab
Generally the default payment distribution should be left as your system administrator has defined it, so you should not need to make any modifications on this tab.
Balances Tab
Set Curr Princ Amount to 568.60.
Set Curr Interest Amount to 2.24.
Set Total Princ Advanced to 600.00.
Set YTD Princ Advanced to 0.00.
Total Princ Paid has been automatically calculated (Total Princ Advanced – Curr Princ Amount).
Set YTD Princ Paid to 31.40.
Set Total Interest Paid to 19.24.
Set YTD Interest Paid to 19.24.
Set Last Payment Amount to 20.48.
Set Last Payment Date to 02/01/2021.
The Balances tab should now look like the example shown below.
Payment History Tab
The payments that have been previously entered on the loan may be entered here as memo entries. This is not required for the loan conversion to work, and so it is entirely optional. Your company may require the entry of this data so that all payment history is stored in one place.
Detail 1 & 2
The Detail tabs contain the user-defined fields for the loan account. No user-defined fields are required for this example.
Click OK to save the loan. The query screen for the loan is shown below.
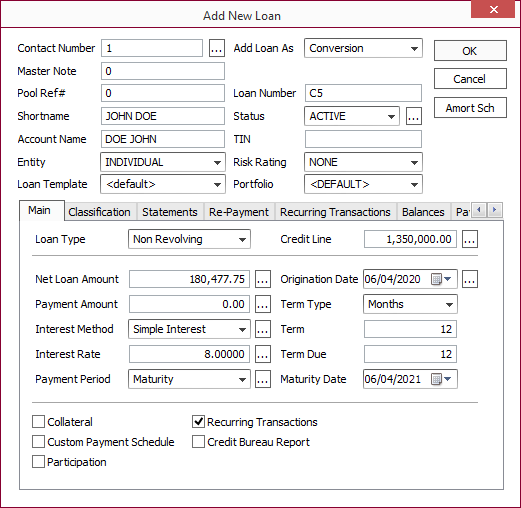
This example is a complete walk through of all of the steps required to convert an existing non-revolving credit line. The example uses specific amounts and dates, and so care must be taken to make the appropriate adjustments if using this example to aid in converting a real line of credit.
Assume the following situation:
On June 4, 2020, a bank approved a construction loan for a commercial real-estate developer. The funds will be drawn only as needed, so the loan will be entered as a non-revolving line of credit. The total credit line includes funds for construction, fees, appraisal, and interest. Interest will be accrued at 8% on funds that have been drawn, and the accrued interest will be due on the 4th of each month, but will be paid automatically with an advance from the credit line. Therefore, we will set the credit line up for all payments on maturity, but we shall capitalize all outstanding interest on the 4th of each month. The total amount of this line of credit will be $1,350,000.00. At the end of the one year period of construction, the entire loan is to be repaid (possibly from the proceeds of a regular mortgage loan on the property).
On Feb 12, 2021, the bank converted this loan to the Nortridge Loan System. As of that date, the current balances of the loan were $180,477.75 in principal, and $315.25 in interest (accrued since interest was last capitalized on February 4). No payments have been made since the balance is due at maturity.
Begin by querying your list of contacts for the borrower and click to highlight the contact in the contact list. Click under on the ribbon bar and select Add New Loan from the drop down menu. A new loan will be added to the currently selected contact.
In the Add New Loan window that opens, select Conversion from the Add Loan As drop down list then enter a loan number in the Loan Number field. Other parameters, such as account name and TIN, will be filled in automatically from the current contact’s existing information.
Main Tab
Set Loan Type to Non Revolving.
Set Credit Line to 1,350,000.
Set Net Loan Amount to 180,477.75.
Leave Interest Method set to Simple Interest.
Enter 8% in the Interest Rate field.
Click next to Payment Period to bring up a pop-up window with more in-depth Payment Period Information.
Payment Period
Set Amort Method to Not Applicable.
Set Interest Period to Maturity.
Set Principal Period to Maturity.
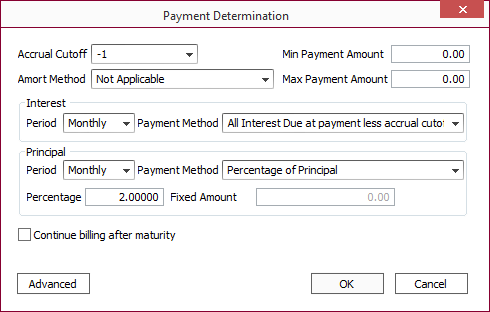
Once these changes have been made, the Payment Determination pop-up window should look like the example shown below.
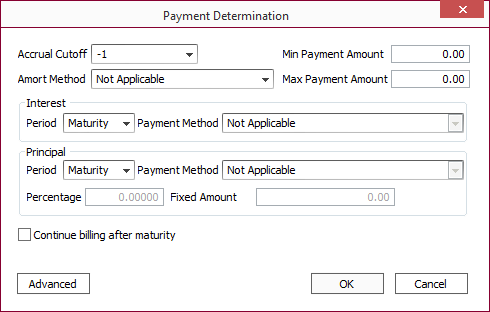
Click OK.
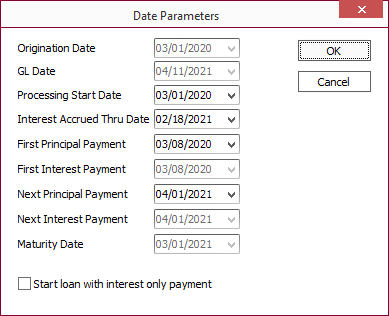
Enter 06/04/2020 in the Origination Date field.
Click next to origination date.
Set Interest Accrued Thru Date to 02/12/2021.
Click OK.
Leave Term Type set to Months.
Leave Term and Term Due both set to 12.
Select the Recurring Transactions checkbox.
The Main tab should now look like the example shown below.
Classification Tab
Select the proper Loan Group, Loan Classes, and Officers for your loan. Your lending institution should have procedures in place to determine which are used for this loan. Their settings are not relevant to the discussion of setting up different types of loans, other than to note that they should be entered at this point in the process.
Statements Tab
Select the billing cutoff. This will determine the day on which a payment is billed.
Example
If the billing cutoff is –10, and the next payment is due on June 4, then the payment will bill on May 25.Select the statement code (or codes) and the late fee code that your company procedures have determined shall be used for this type of loan.
Re-Payment Tab
Generally the default payment distribution should be left as your system administrator has defined it, so you should not need to make any modifications on this tab.
Recurring Transactions Tab
Click Add .
Event Tab
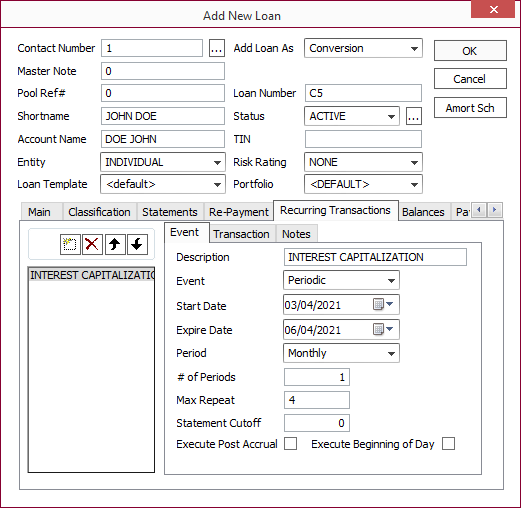
Enter Interest Capitalization in the Description field.
Select Periodic from the Event drop-down list.
Change the Start Date to 03/04/2021.
Set the Expire Date to 06/04/2021.
Leave the Period set to Monthly, and leave # of Periods set to 1.
Set Max Repeat to 4.
Set the Statement Cutoff to 0.
When these changes have been entered, the Event tab should look like the example shown below.
Transaction Tab
Leave the Transaction Type field set to Transaction Code.
Select transaction code 312-Capitalize Interest from the Transaction Code menu.
Change Amount Type to Percentage of Current Interest.
Set Percentage to 100.
When these changes have been entered, the Transaction tab should look like the example shown below.
Balances Tab
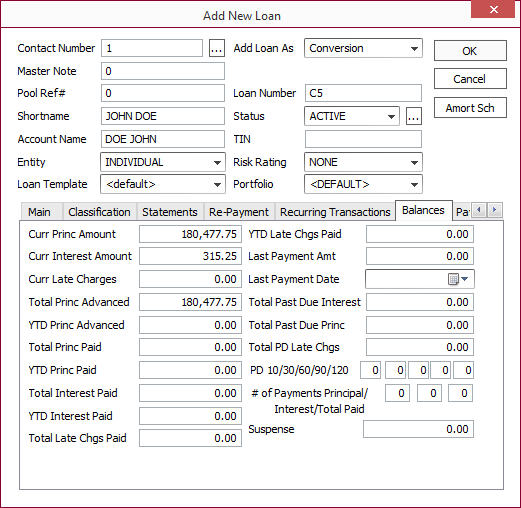
Enter 180,477.75 for Curr Princ Amount.
Enter 315.25 for Curr Interest Amount.
Enter 180,477.75 for Total Princ Advanced.
The Balances tab should now look like the example shown below.
Payment History Tab
The payments that have been previously entered on the loan may be entered here as memo entries. This is not required for the loan conversion to work, and so it is entirely optional. Your company may require the entry of this data so that all payment history is stored in one place.
Detail 1 & 2
The Detail tabs contain the user-defined fields for the loan account. No user-defined fields are required for this example.
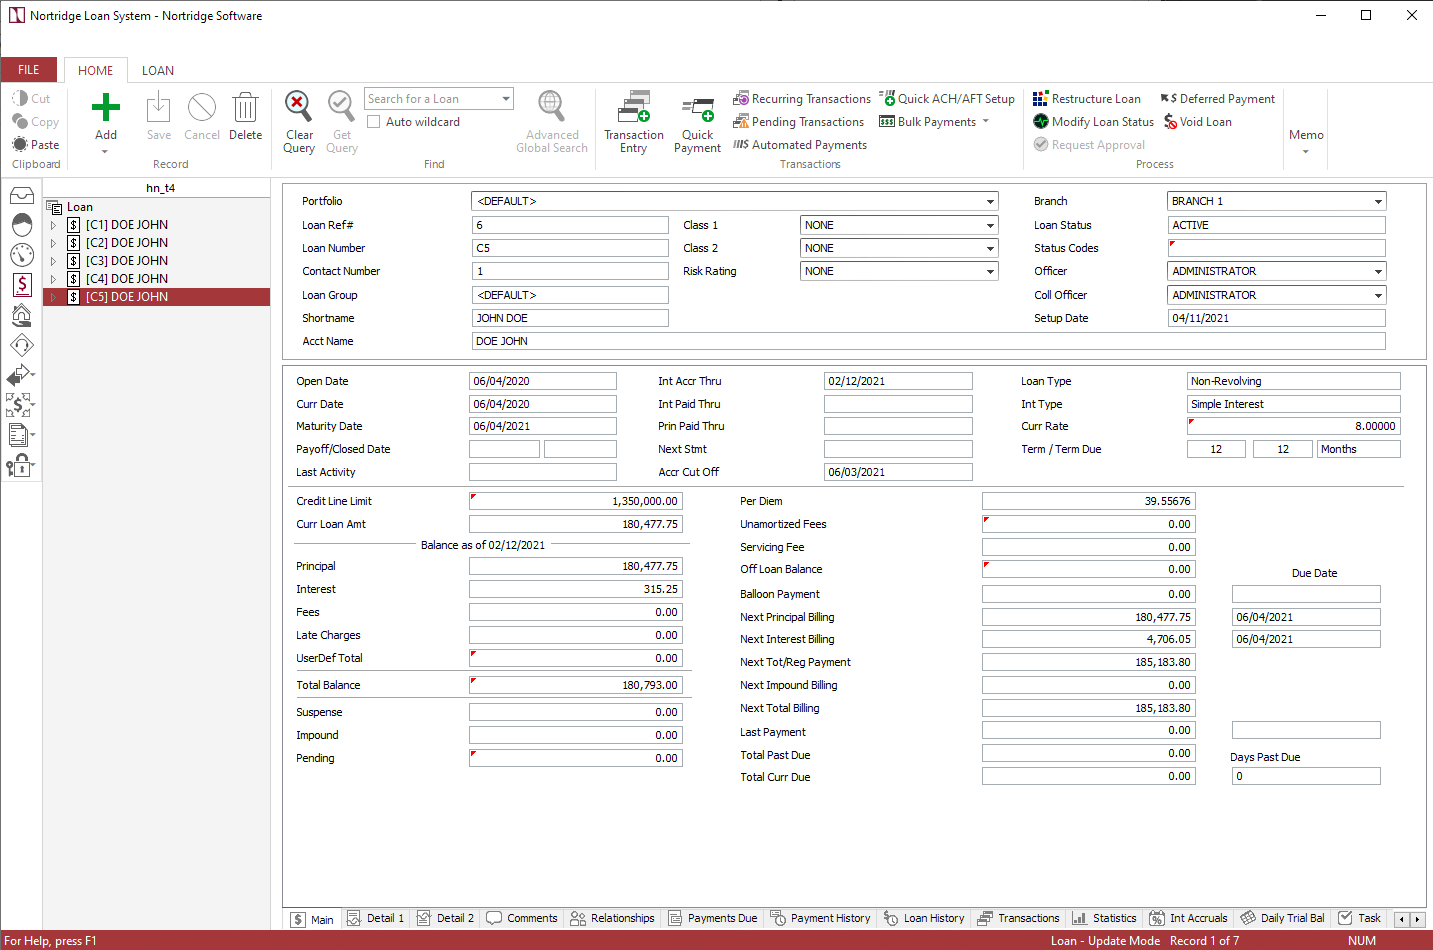
Click OK to save the loan. The query screen for the loan is shown below.
This example is a complete walk through of all of the steps required to convert a loan with an irregular payment cycle. The example uses specific amounts and dates, and so care must be taken to make the appropriate adjustments if using this example to aid in converting a real loan.
Assume the following situation:
On March 1, 2020, a bank loaned $45,000 to a commercial fishing company for the purchase of a new boat and equipment. The money is to be loaned at an interest rate of 5% for a term of 5 years. Because the fishing company will not be in operation during the winter months, only nine monthly payments will be due each year, on the first day of each month from the first of April through the first of December. Each payment will consist of $1,000 to be applied toward reducing the $45,000 principal, plus all current accrued interest. The first payment of each year (April 1) can be expected to be the largest payment of the year, as it will include four months worth of interest. Coming due right after the lucrative first fishing expedition of the season, the fishing company finds these terms acceptable.
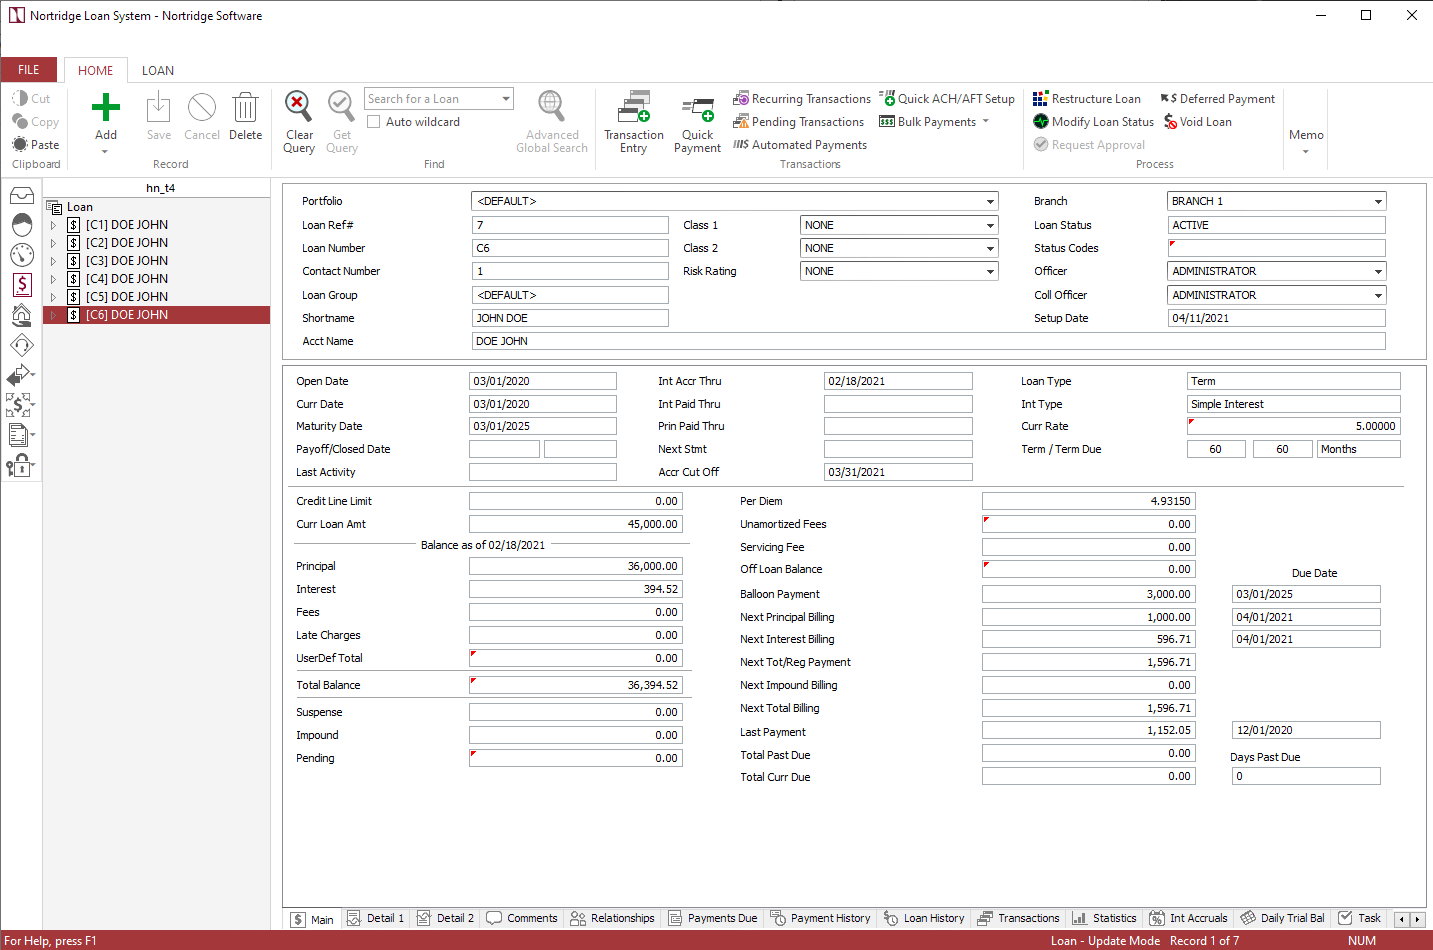
This loan was entered on to the bank’s old loan system on March 1, 2020. By February 18, 2021, the bank is converting all of the loans on its old system to the Nortridge Loan System. As of that date, nine payments have been made. The remaining principal is $36,000. The current interest is $394.52. The total interest paid so far is $1,544.78. The last payment was made on December 1, 2020 for $1,152.05, and the next payment is due on April 1, 2021.
Begin by querying your list of contacts for the borrower and click to highlight the contact in the contact list. Click under on the ribbon bar and select Add New Loan from the drop down menu. A new loan will be added to the currently selected contact.
In the Add New Loan window that opens, select Conversion from the Add Loan As drop down list then enter a loan number in the Loan Number field. Other parameters, such as account name and TIN, will be filled in automatically from the current contact’s existing information.
Main Tab
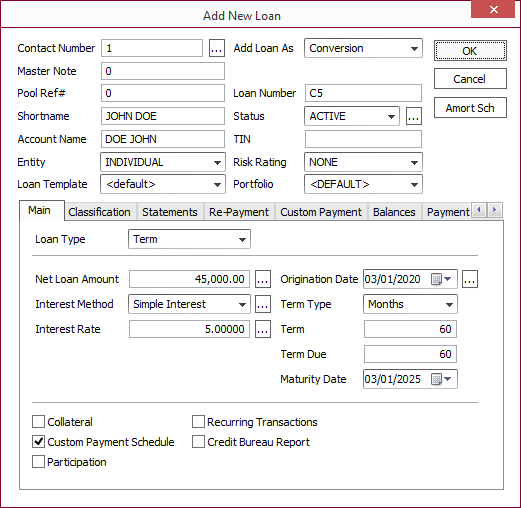
Leave Loan Type set to Term.
Enter 45,000 in the Net Loan Amount field.
Leave the Interest Method set to Simple Interest.
Enter 5% in the Interest Rate field.
Set the Origination Date to 03/01/2020.
Click next to Origination Date to bring up the Date Parameters pop-up window.
Date Parameters
Set Interest Accrued Thru Date to 02/18/2021.
Set First Principal Payment to 03/08/2020.
Set Next Principal Payment to 04/01/2021.
Once this change has been made, the Date Parameters pop-up window should look like the example shown below.
Click OK.
Leave Term Type set to Months.
Set the Term and Term Due fields both to 60.
Select the Custom Payment Schedule checkbox.
The Main tab should now look like the example shown below.
Classification Tab
Select the proper Loan Group, Loan Classes, and Officers for your loan. Your lending institution should have procedures in place to determine which are used for this loan. Their settings are not relevant to the discussion of setting up different types of loans, other than to note that they should be entered at this point in the process.
Statements Tab
Select the billing cutoff. This will determine the day on which a payment is billed.
Example
If the billing cutoff is –10, and the next payment is due on September 1, then that payment will bill on August 22.Select the statement code (or codes) and the late fee code that your company procedures have determined shall be used for this type of loan.
Re-Payment Tab
Generally the default payment distribution should be left as your system administrator has defined it, so you should not need to make any modifications on this tab.
Custom Payment Tab
For the conversion loan, we will only be adding custom payments that are due after the conversion date.
Click Add .
Set Payment Type to Fixed Principal payment plus accrued interest.
Select Use actual due date.
Set Actual Due Date to 04/01/2021.
Set Amount Type to Fixed Amount.
Set Amount Fixed to 1,000.00.
Select a Late Fee Schedule if desired.
Click OK to add payment 10 (April 1, 2021). [In the custom payment schedule for the conversion loan this will be shown as payment #1.]
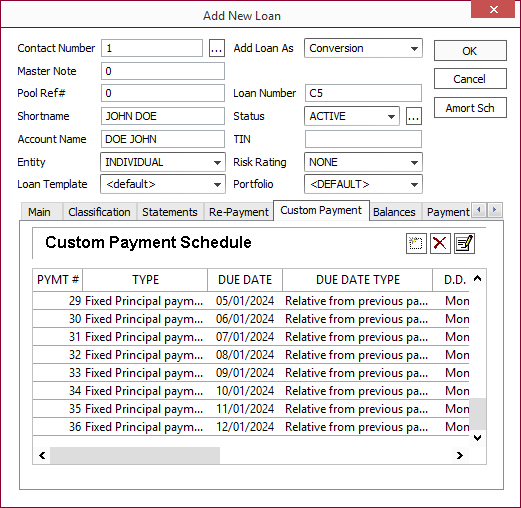
To add payments 11–18, click Add then use Due Date Type of Relative from Previous payment. Set Number of Periods to 1, and set Repeat to 8. Enter the amount type and fixed amount just as you did on the last one.
Click OK to add payments 11–18 (May 1, 2021–December 1, 2021). [payments 2–9]
Now we skip three months by setting Number of Periods for the next payment to 4, and setting Repeat to 1. Click OK to add payment 19 (April 1, 2022). [payment 10]
Once again we enter the following eight payments by setting Number of Periods to 1, and Repeat to 8. Click OK to add payments 20–27 (May 1, 2022–December 1, 2022). [payments 11–18]
Once again we skip three months by setting Number of Periods for the next payment to 4, and setting Repeat to 1. Click OK to add payment 28 (April 1, 2023). [payment 19]
Once again we enter the following eight payments by setting Number of Periods to 1, and Repeat to 8. Click OK to add payments 29–36 (May 1, 2023–December 1, 2023). [payments 20–27]
Once again we skip three months by setting Number of Periods for the next payment to 4, and setting Repeat to 1. Click OK to add payment 37 (April 1, 2024). [payment 28]
Once again we enter the following eight payments by setting Number of Periods to 1, and Repeat to 8. Click OK to add payments 38–45 (May 1, 2024–December 1, 2024). [payments 29–36]
Although the loan is not officially mature for another three months, that 45th payment should have paid off the entire Principal.
Once all of the payments have been added, the Custom Payment tab should look like the example shown below.
At this time, it may be a good idea to check to make sure that each payment listed in the custom payment schedule shows the proper date, type, and amount. This will allow you to capture any entry errors before these payments actually bill.
Balances
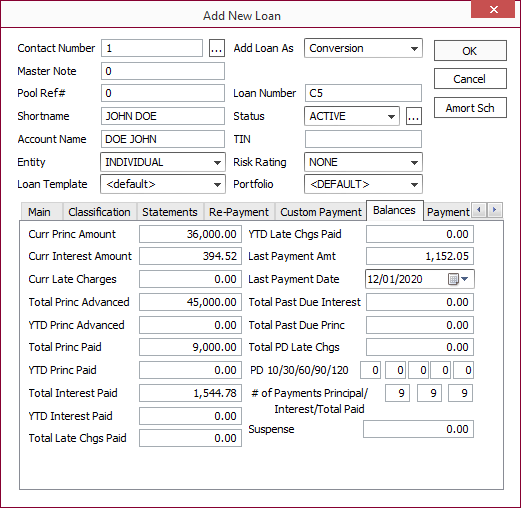
Set Curr Princ Amount to 36,000.
Set Curr Interest Amount to 394.52.
Set Total Princ Advanced to 45,000.
Set YTD Princ Advanced to 0.
Leave Total Princ Paid set to 9,000.
Set YTD Princ Paid to 0.
Set Total Interest Paid to 1,544.78.
Set YTD Interest Paid to 0.
Set Last Payment Amt to 1,152.05.
Set Last Payment Date to 12/01/2020.
Enter 9 in each of the three # of Payments boxes.
The Balances tab should now look like the example shown in below.
Detail 1 & 2
The Detail tabs contain the user-defined fields for the loan account. No user-defined fields are required for this example.
Click OK to save the loan. The query screen for the loan is shown below.