Adding a Contact
To add a new contact, click Contact  on the shortcut bar and click Add
  in the ribbon or click
  under the Add button and select Add Contact.
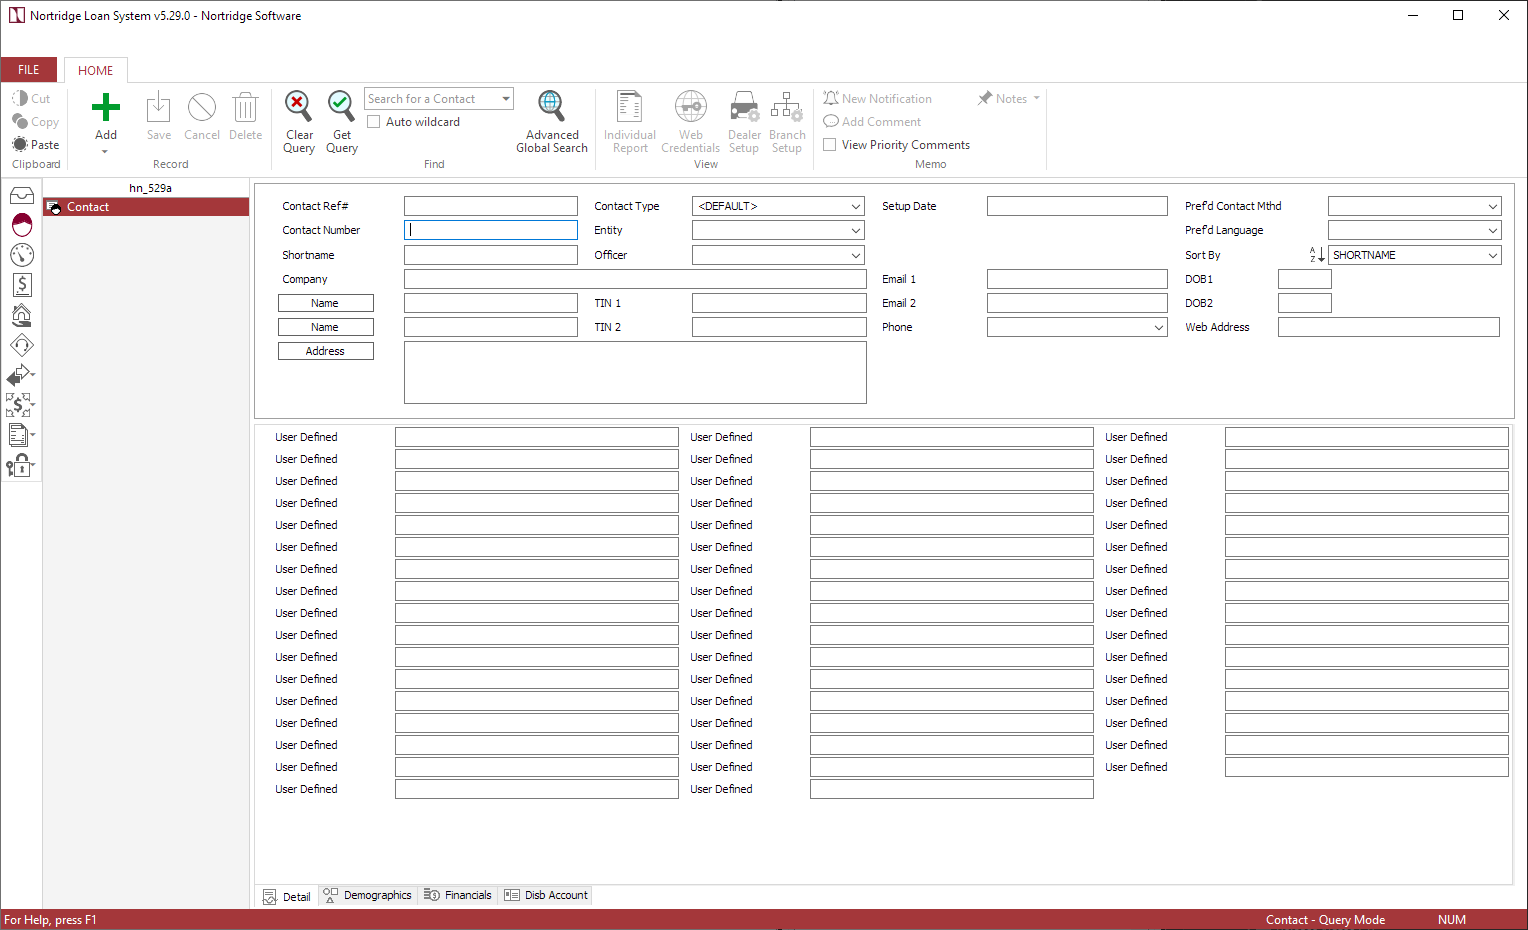
Enter information in all appropriate fields (as defined below), using your Tab key or your mouse to move from field to field.
When you have finished entering your data, click Save to save the new contact.
Tip
When adding a new contact, the save button will be active. The save button is not active on the contact query screen.
| Contact Ref # | This reference number is assigned by the system automatically. This field is not user editable. |
| Contact Number | You must enter a unique alphanumeric code for the contact’s account number. It may be up to 25 characters in length. If Enable Auto Numbering is selected in Contact Setup > Contact Type this field will be filled in automatically when the contact is saved. |
| Shortname | The shortname is used to aid in the Contact search and is also used on some loan reports (which may not have enough space for a full name). It is usually entered as a combination of the customer’s last name with first initials added at the end, but there are no specific requirements. You may enter any variation or nickname up to 20 characters in length. |
| Contact Type | Drop down list to select contact type as defined in Contact Setup > Contact Type. <Default> is selected by default. |
| Entity | Select one of your predefined Entity Codes from the drop down list. The selected Entity Code will determine the icon which will represent this Contact on the search tree, as well as the arrangement of the Company / Name section of the Contact. |
| Officer | The list of NLS system users from the Security Profiles will be available on this drop down list. The system will automatically default this selection to the user currently signed on. |
| Setup Date | This date value is assigned by the system at the time the Contact is entered. This field is not user editable. |
| TIN 1 | TIN stands for Tax ID Number. This is an individual’s Social Security Number or a Corporate Entity’s TIN. SSNs are generally entered in the format xxx-xx-xxxx. A second TIN 2 field will be available if the Entity code is Couple or Organization type entity. The field can be configured to display its data in an unmasked or masked format (*******1234) by setting a user’s or group’s Un Mask privilege under Contacts > Contact Records > Field Level Access > Tax Identification Number. |
| DOB 1 | The Date of Birth field is a required identifier for credit bureau reporting. Click  to enter a date using the popup calendar. A DOB 2 field will be available if the Entity code is Couple or Organization type entity. To clear the field, right click and select Clear Date. to enter a date using the popup calendar. A DOB 2 field will be available if the Entity code is Couple or Organization type entity. To clear the field, right click and select Clear Date. |
| The Date of Death field is available for credit bureau reporting. Click to enter a date using the popup calendar. A DOD 2 field will be available if the Entity code is Couple or Organization type entity. To clear the field, right click and select Clear Date. When a DOD is set, the ECOA code in the credit bureau setup/notes will be set to X = Consumer Deceased. The DOD field is hidden until it is needed. To make a DOD entry, right click on the DOB field and select Set Date of Death to show the DOD field for entry.
When the DOD field is set, ECOA code “X” will be reported on the contact’s credit report for that month. Subsequent reporting for the deceased individual will not occur. For couple entity, if the deceased individual is the primary borrower, their partner replaces them in the B record and is no longer listed in the J2 record after the primary borrower is reported deceased. If the partner is deceased, they are removed from the J2 record. If the primary borrower as an individual entity or both the primary borrower and their partner in a couple entity are deceased, the next available co-borrower in a loan’s relationship will replace them in the B record and is removed from the J2 record. Additional co-borrowers are parsed in the order that they were added to the loan. |
|
| Company | This field only appears if the selected Entity Code is a Organization type entity. Enter the Company Name in this field. |
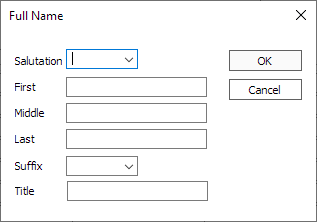
| Name | Enter the full name of the customer in this field. The name will be broken down by NLS into first, middle, and last names based on the location of the spaces. To view this breakdown, or to override this automatic breakdown, click  . .
 |
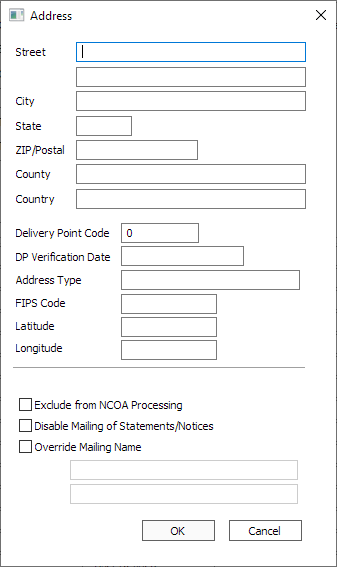
| Address | Enter the full address in this field. The address will be broken down by NLS into its component parts according to the location of spaces and carriage returns. To view this breakdown, or to override this automatic breakdown, click  . .
 |
| Phone | The field name here changes based on which of the various phone numbers stored for the Contact is currently selected. The default Phone number type is Home. Click  at the right side of the field to see a drop down list of phone number entries for this account. Select Edit Phone… from the drop down list to add a new phone entry. You can set any phone number to be the default (called Primary) phone number for this Contact. There is also a Do Not Call Flag which may be set to indicate a phone number that should not be used. at the right side of the field to see a drop down list of phone number entries for this account. Select Edit Phone… from the drop down list to add a new phone entry. You can set any phone number to be the default (called Primary) phone number for this Contact. There is also a Do Not Call Flag which may be set to indicate a phone number that should not be used.
NLS 5.6 and earlier Right-click on the phone number and select Edit TAPI Settings to set up NLS to communicate with TAPI devices which have been configured and registered with your operating system. Please refer to the documentation provided with your TAPI device or phone system to configure the TAPI device. 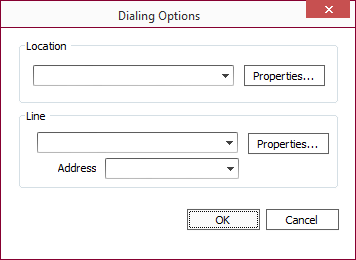 Through this setup dialog, you may configure your telephony equipment. Once NLS has been configured to work with your TAPI device, TAPI will handle the outbound dialing through the configured telephone device when you double click on any phone number field in NLS. |
| Email 1 | Enter the email address of the Contact in this field. An Email 2 field will be available if the Entity code is Couple or Organization type entity. The Email 1 field is the default selection in a drop down list that includes an Email 1 and an Email 2 in the list. |
| Web Address | If your customer has their own web page, you may enter its address in this field. |
| The preferred contact method (email, SMS, phone, etc…). | |
|
Pref’d Language5.11+
|
The preferred language (English, Spanish, French, etc…). |
|
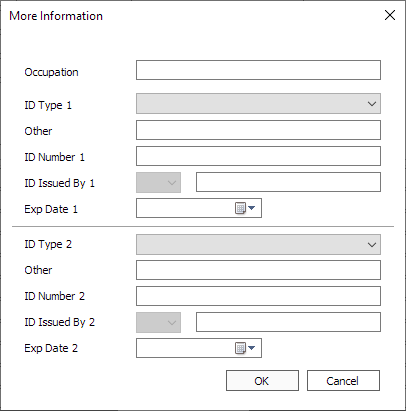
More Information5.20 - 5.28
|
Note This feature has been removed in NLS 5.29 and the same information can be entered in the Identity tab. Any information that was entered in this dialog prior to NLS 5.29 has been migrated to the Identity tab.
|
The lower portion of the Contact screen is dependent on which Contact tab is currently selected. Each of these Contact tabs is detailed separately.
